Pages

Wednesday, December 8, 2010

A little teaser - the first post in a long time!

Everything have been standing a bit still here at the blog (this goes out to you, Peter!). I got a new job in April being a fulltime viking. A actually that is what it turned out to be - a lot of wonderfull work and not a lot off spare time. Mikkel and Simon have also been buzy. With work, studying, attending new and exciting events but also making diffentent projects. So eventhough we haven´t been writing so much our hands have been buzy. Mikkel and I have among a lot of things been making viking clothes. So this little update is a teaser for more posts to come!

Also we could like to say hi and much velcome to the many new readers here at Haandkraft. It is lovely to see so many people tuning in eventhough we haven´t written for at while.

Friday, May 7, 2010

Scabbard


This week I made a scabbard for Louises new knife. I am quite pleased with the result, but I must admit that I am not very experienced at working with metal. I am getting better at handleing it though.
The only thing that bothers me is all the polishing and filing. I have always thought that my life was too short for sandpaper, but with metal there is no way around it (that I know of).

So rather than telling you how I did this scabbard I will give you a link to a swedish guy who makes scabbards and knifes like this one... Only much much better.
Be sure to have a look at his blog!

I have been looking at his knifes quite a lot, during the makeing of this knife. I especially like this knife, that he made in 2009. (Keep up the great work Frej!)

Tuesday, May 4, 2010

A knife for Louise

I just finished this knife, that I made for Louise. She will need a knife for her new viking-job, so I made one from another knife that I had.

I have been looking a bit at knifes from the 9th and 10th centuries, and found some nice examples from Sweden, that I really liked. They have wire wrapping around the handle and some were found in womans graves. So I thought that that would be just the thing for Louises new knife.


I used beech wood for the handle and brass for the end plates and wire wrapping.
The blade was made by my good friend Jesper.


The wrapping is made as a "common whipping". A type of knot where you draw the knot itself under the wrapping and cut of the edges.
I am not sure if the wire wrapping on the excavated knifes were done this way, but I wasn't able to find any info on this anywere.
The whipping works just fine and if it is made tight enough it will surely stay in place.


Here is a picture of one of the original knifes. This one is from Gotland. From a female grave (grave 503 at Ihre, Hellvi parish, Gotland). 9-10th C.

I got the picture from this site: Dark age recreation company
There are also some examples of knifes with wire wrapping in the collections of Historiska Museet in Sweden.

Saturday, April 24, 2010

Another bone belt buckle.

I just made another bone buckle last night. It is inspired by one made by an english guy (i think) who has made replicated artifacts for various museums. Including some for a museum in Ribe (Here in Denmark). All of very high quality stuff.
You can check out his archive here: Roland's archive (It's all good!)


The buckle I made is inspired by this one.
But it lacks the ornaments on Rolands example. Since I still have to learn how to do that.


Here Is the buckle just after the initial sawing.


And here it is after most of the filing has been done.

I am really starting to enjoy working with bone. So I am definately going to make some more bone stuff in the future.

Friday, April 23, 2010

Going Viking!

Since Louise has now gotten herself a new job in the "viking ages" (At Bork vikingehavn) I have been thinking more and more about making some viking period stuff. I will of course visit Louise at her new job and do some crafts, so I need new clothes for the right period.

I have not quite decided what to make in terms of clothes, but I am aeking to get to do something. So I made a thing that I will surely need, whatever clothes I might decide to make - A belt.

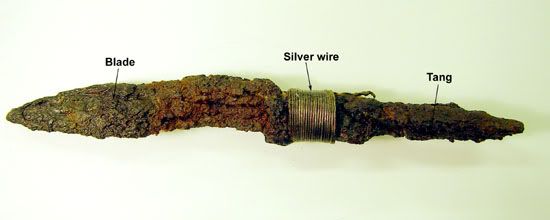
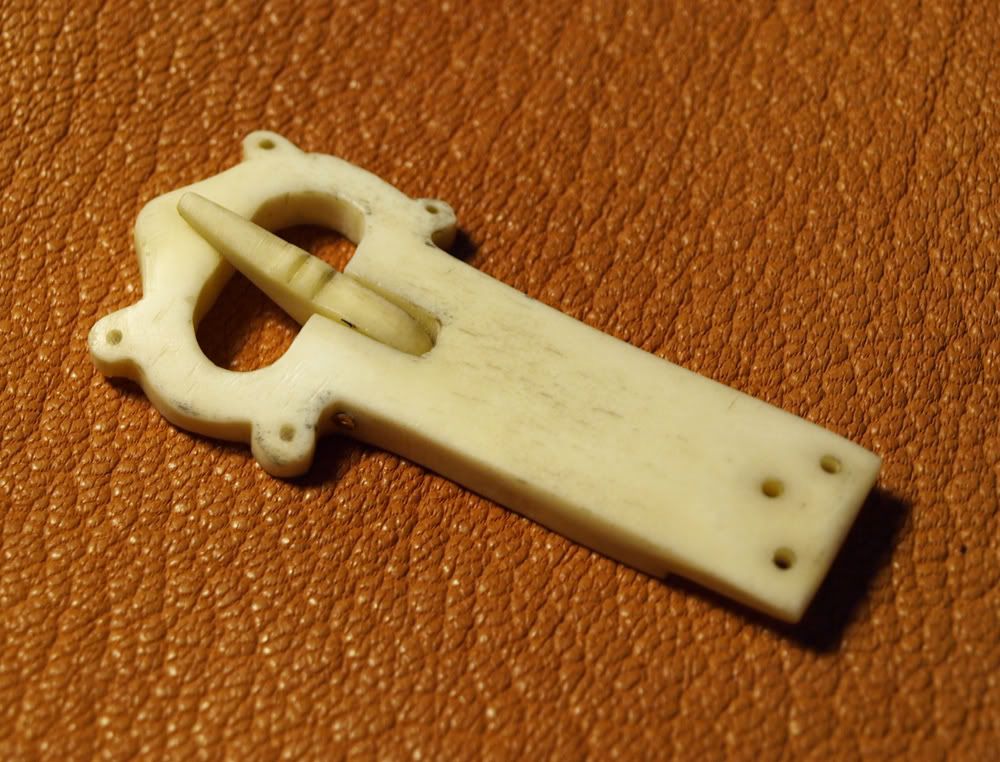
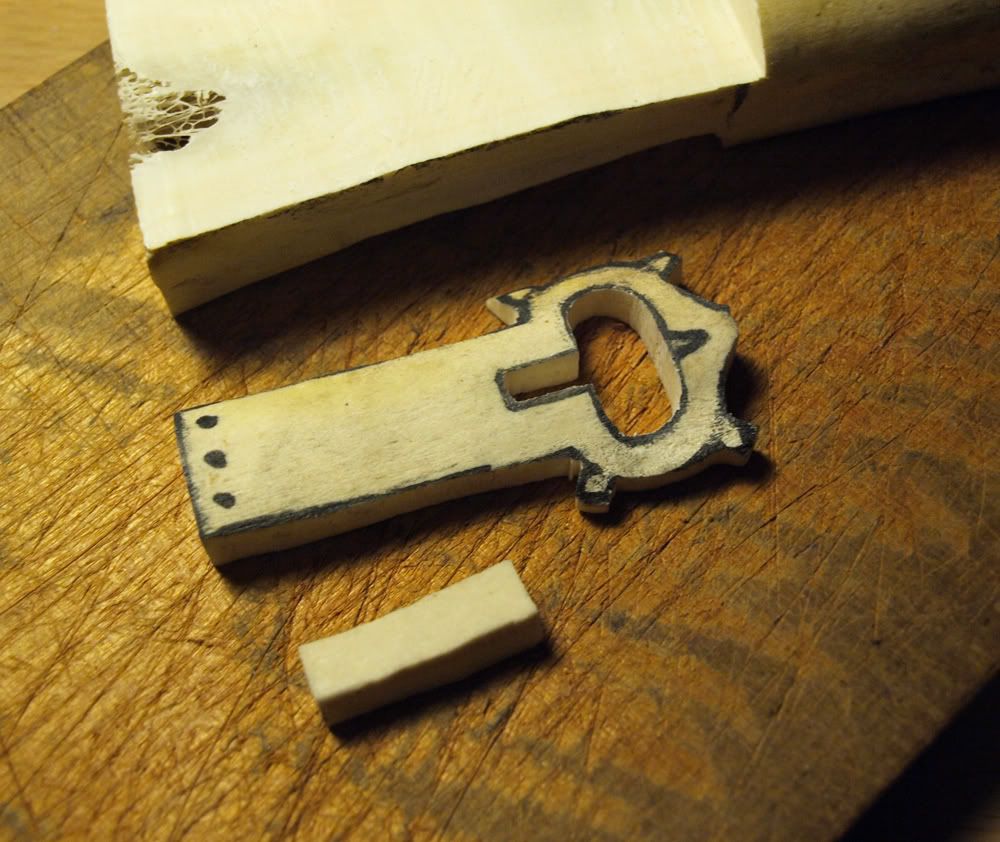
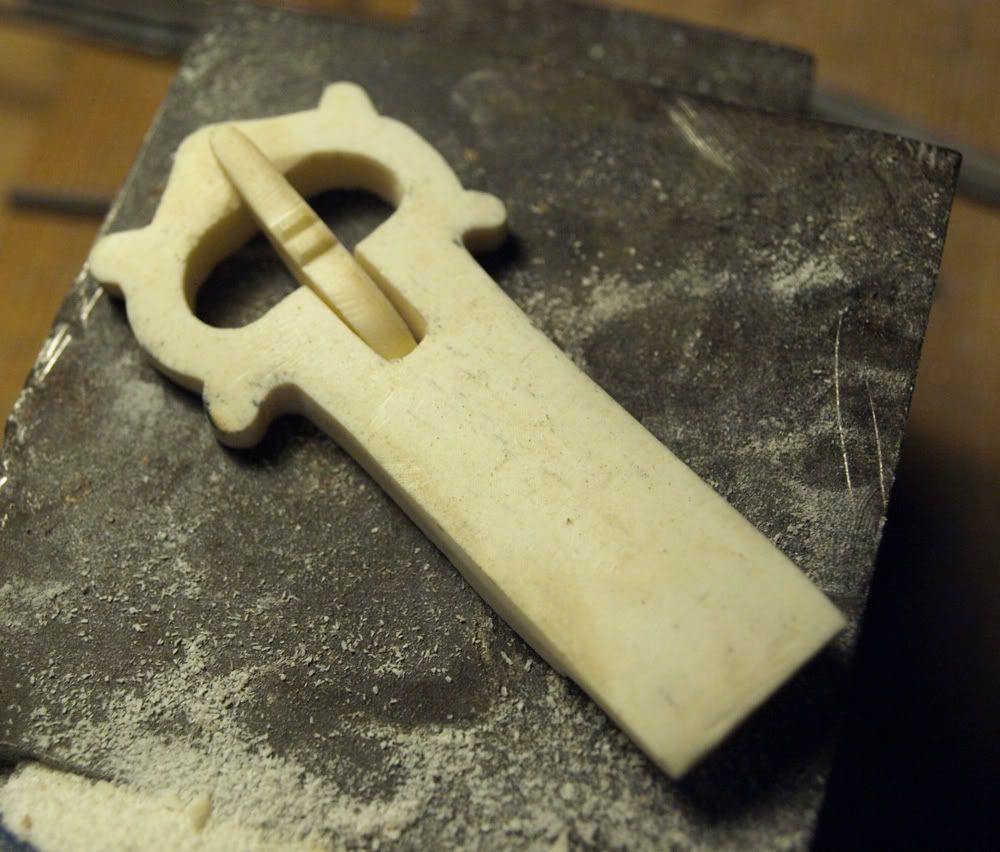
I have long been facinated by bone buckles from the viking and medieval period, so that is what I have made. That way I could also try to use a new material (bone) and finish an old project that I have been wanting to finish for a long time - the pump-drill that I made last year.


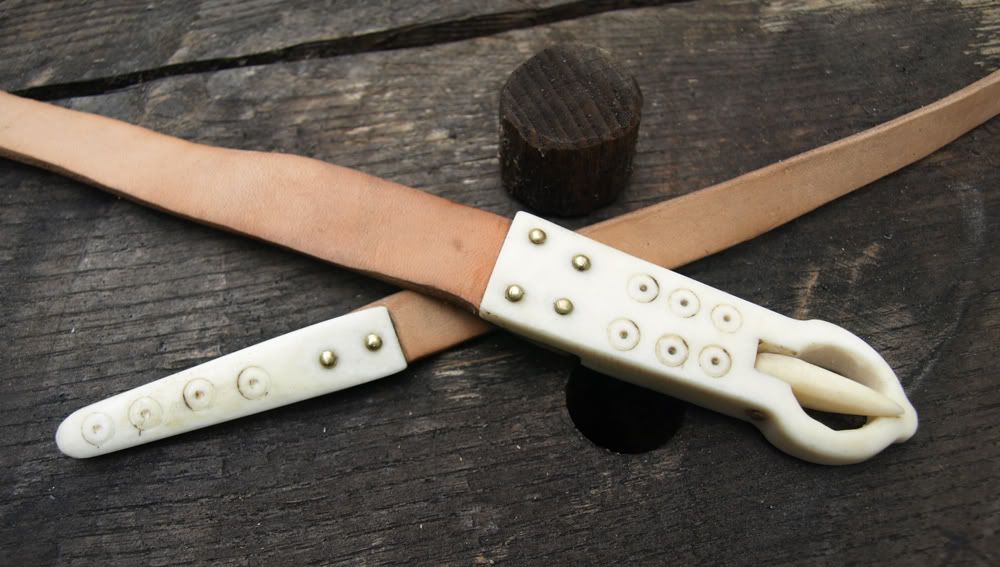
The buckle is made from pieces of pig bone that I had lying around. I sawed the bone into plates and cut out the basic form using a coping saw. The I refined the shape using various rasps and files. The pin is set in place with a piece og brass rod, riveted on both sides of the buckle.
The buckle was then fittet on the belt using brass rivets.

The belt is aproximately 2 cm wide.

I needed the pump-drill to make the cirkle-pattern on the buckle and strap-end, so I made a small drill bit to fit in the pump drill. It turned our like this.


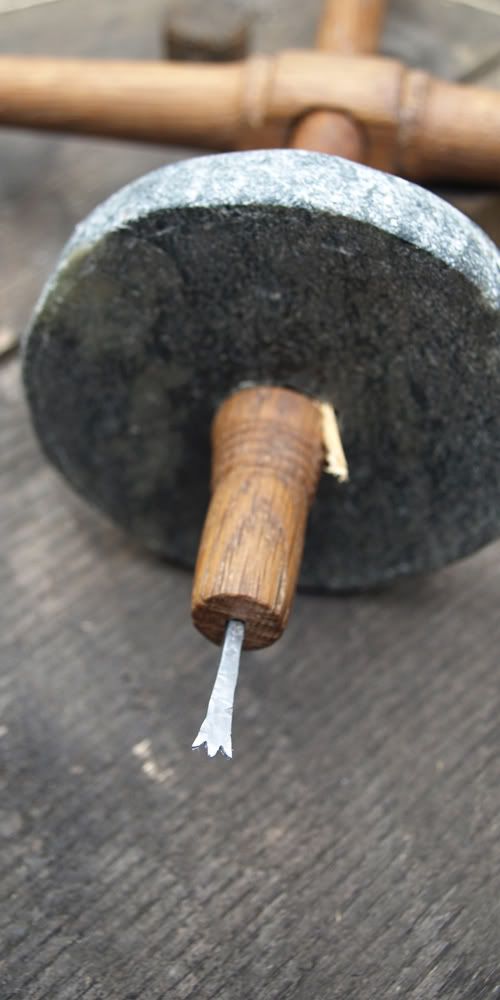
The bit is simply made by hammering flat a steel nail, and then filing out the "teeth". I didn't harden or temper it, but it works great none the less.
The bit is 5 mm wide.

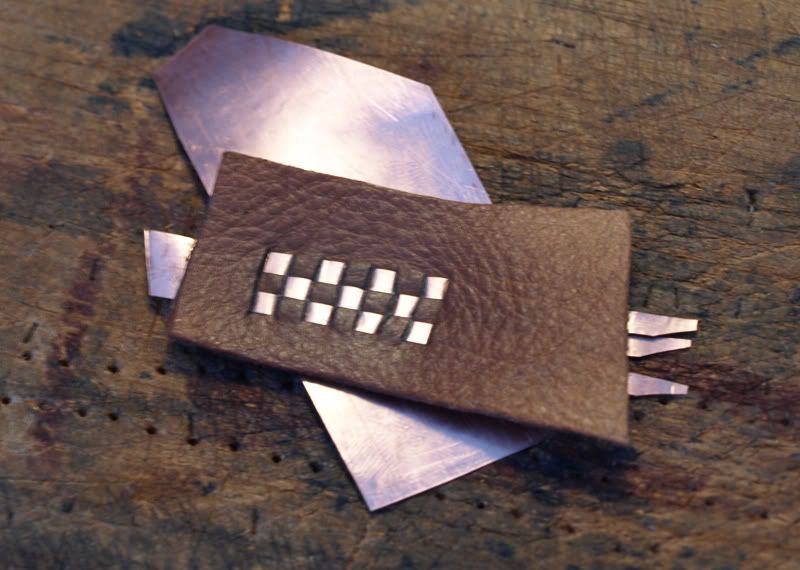
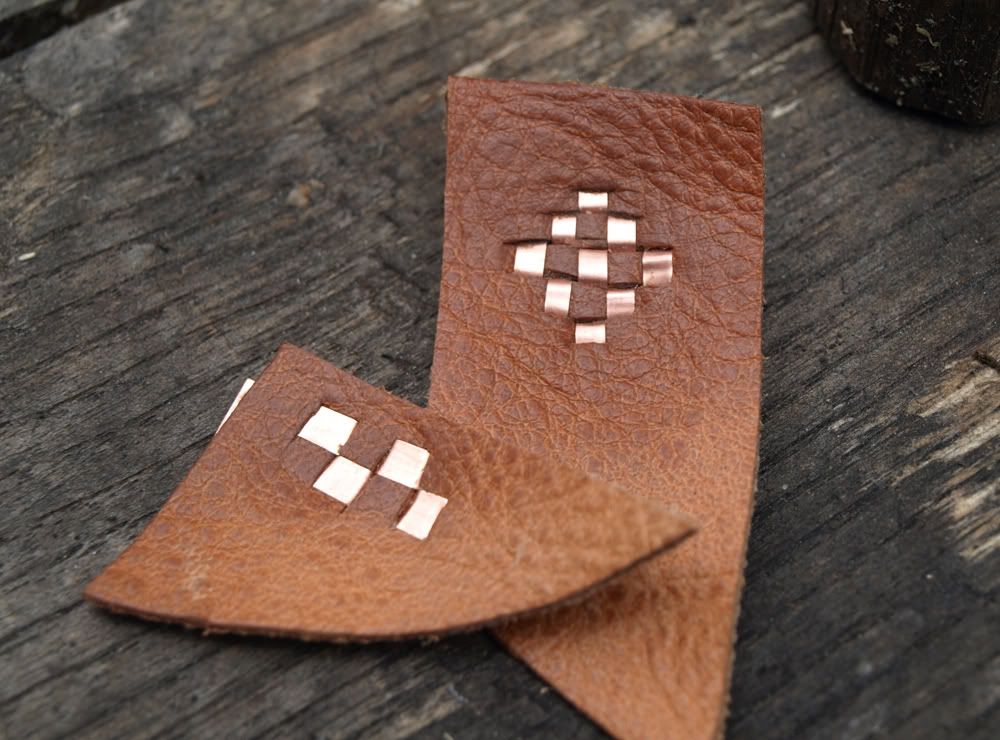
And then there is another viking-related project, that I want to get back to. Since I made the Birka-wallet I have been wanting to make another one. The last was not the correct size and I read somewhere that the braids were done using metal foil rather than leather. So that is what I will try to do this time.
Although I still need to get the exact measurements from the originals (If you have them, I would be very interested in hearing from you! I believe they are in one of the Birka-books).

Here are some experiments I made, using copper foil for the braiding. I think it looks very nice.


More Viking crafts is yet to come... We are danes after all ;-)

Wednesday, February 24, 2010

Bollock dagger

I have had this blade for a bollock dagger lying around for almost two years now. So I thought that it was due time to do something about it.
Therefore I spent some time during my winter holiday carving a handle for it.

I first ordered the blade when I saw this bollock dagger at the National museum in Copenhagen a couple of years ago. I really liked the octagonal handle and wondered why I hadn't really seen any reproductions of these daggers with that type of handle.
My handle is not a reproduction of the one I saw though. Just inspired by the shape of it.

Here is the one I made:


The handle is made from the root of waht I believe was a cherry tree. I'm not exactly sure, since It had been on the ground for a long time. The bark was falling of and the leaves were long gone. But I managed to get a good chunk of one of the roots sticking up from the ground.


The scabbard-design is inspired from some of the scabbards in "Knives and scabbards" and is made from two layers of leather.

Monday, February 22, 2010

Needlecase

It's been a long time since I did one of these. So I decided to make one.
Hope you like it.

I made the inside from a piece of half tanned leather. This gets very stiff after drying, so the inside won't get wobbly after some time of use. If the inside gets soft it can't keep the top in place, wich is a problem.

Spoons, spoons, spoons!

Lately I have been carving like crazy! I have set up a chopping block in our living room and spent almost every evening for the last couple of weeks carving spoons.
I suppose it is a bit like knitting... only a bit more manly.

Here are a couple of pictures of some of the projects I have been working on.

First these medieval spoons. I shamelessly copied the design from some spoons made by Robin Wood. They are based on a spoon from Lübeck, dated to "The middle ages" (ca. 1100-1500).


A ladle. Not based on anything i particular. I just liked this type of "spoon" som I decided to make one. The wood is birch like all the other spoons, that I have done. Only this turned quite dark, because I stored it in a plastic bag for a couple og days. I quite like the colour.


Normal spoons for eating. These are actually some of the first ones I made.


Another ladle carved from a crooked branch. The grain follows the curve of the bowl and handle. Making the spoon more durable.


I would do a guide on carving spoons if there wasn't already a couple of these out there. Therefore I will point you in the direction of some of these.

First a couple of videos (by the fabulous Robin Wood). Be sure to watch all four of them!

Second is the "Bodgers ask & awnser forum", wich I have linked to on earlier occasions. There are lots and lots of clever people using this forum. And they are always keen on helping.

Friday, February 19, 2010

More Colour please!

While winter is still here with lots of snow and frost I´m continuing with my in-door dyeing. Can´t help my self! It is great to find the medieval spirit again - I have some how lost it in a lot of knitting projects. But I can now see the forthcomming markets and great medievaltrips as a kind of carot in front of me and this really helps. I have already sold some of my dyed yarns and this finances bying more wool and yarns.


I have dyed with Solidago canadensis, also know as Canadian Goldenrod. I have dyed woth woolen yarns and silk and the green is from adding iron in the end of the dye.

Sunday, January 31, 2010

Dyeing with mushroms

Winther have really got it´s strong hold on Denmark and for the moment it seems like a very long time to spring and summer. I´m really missing my plant dyeing and the colourfull yarns that it gives. Thankfully one of my friends from our medieval group gave me a large amount of mushroms in november in exchange for something nålebundet. I was thrilled that she had picked so many which were enough to dye fabric in the size of 1 m x 1,6 m.

So a couple of weeks ago I got the earge to dye and found the dryed mushroms in the basement.

I have never dyed with mushroms before and didn´t know how many grams to use for the 1 meter of fabric that I had. So this was kind of an experiment - to see how much colour the mushroms gave.The mushrom that I used is in danish called Cinnober-slørhat, and in latin Cortinarius cinnabarinus. It should give a redish colour which I was quite excited about since one of the only other plants that give red is madder.

Before dyeing I chopped the mushroms in to very small pieces and let them soak in water for 24 hours. Mikkel surgested this so that I could get as much colour out of the mushroms as possible. The colour soup became very red as you can see in the pictures and when the fabric went in it took in the colour very fast.


The result became much more dark in the colour than I had emagined but this was a very good result. I was very surprissed to see how close to madder the colouration really is.

There is some areas were you can see that the colourations is not perfekt. This might have something to do with a to small pot were the fabric wouldn´t more or/and that when I did the mordant I didn´t move the fabric enough. I used the colour soup for a secound time and was happy to see that this also gave some colour. I´m not sure that I´ll use the yarns for medieval things, but I can use it for knitting something moderne.

I´m really starting to want to dye again and thankfully I have some dryed plants in the basment. Now we just need the snow and frost to go away so that I can try my new modern gas cauldron that holds up to 60 liters.

Saturday, January 9, 2010

Spoon carving

As I am writing a project for an upcomming exam, I was getting desperate to get to do something other than writeing. So I decided to do a bit of carving.
The result is this spoon.


It is based loosely on a type og medieval spoon. Charaterised by a wide cirkular bowl and a quite short handle.
This one is carved from birch wood (Betula pendula).

The inspiration came from this 15th century spoon... and the spoon to the right in this picture (From Nationalmuseet in Copenhagen)

The trick to eating with a spoon like this is to drink from the edge of the bowl rather than putting the whole thing in your mouth.