Pages

Friday, December 4, 2009

Sewing the leather cower for a wooden scabbard

Someone asked me how I "attach" the leather to the scabbards that I make. So I thought that I would post some pictures to expalin it.
It's pretty straight forward, but pictures always help.


I use some pretty supptle leather for these scabbards.
This is calfskin and just about 0.6-0.8 mm thick. It is very streatchy and soft.


First I glue some leather strips on to the core. These will appear as raised areas after the core has been covered and they will help the belt to stay in place, and make sure it won't slide down.


In the next three pictures you can se how the leather is fitted to the tip of the core. This way of doing it gives a pretty tight fit.
The leather is also soaked in water before being sewn to the scabbard. This makes it more streachy and therefore reduces the danger of tearing the leather when sewing it togeather. When the leather dries it will shrink and make the fit even tighter. This way you can avoid using any glue at all!


First you fold up the tip.


Then the sides.


... And you start sewing!
As you can see I cut the leather to size as I go along. Then i don't risk takeing off to much.


Sew all the way to the top, fold down the upper rim and stich it in to place.


Tie some string around the leather risers to streach the covering into the corners.


Let it dry for a day and it's ready to be fitted with a belt!

Wednesday, December 2, 2009

A recommendation

For those of you who are interested in carpentry.
I just found this book on different techniques for making joints in wood. It has a lot of pictures and descriptions of various techniques.

Woodwork joints

Wednesday, November 18, 2009

Scabbards

My dear friend (and blacksmith) Jesper ocationally get to make som swords for his clients. He is very good at smithing, but not quite as good at working with leather. Therefore I make the scabbards for the swords that he makes.
Actually he makes the sword AND the wooden core for the scabbard and i dress it up in leather.

So far I have made two scabbards for him. Both for early medieval swords. The design is made after the instructions drawn out by Peter Jonhson (See this thread on "My armoury" for details).

It is a pretty straight forward design and one that I have really enjoyed working with. I really like all this "braiding and weaving" og the leather.


This is the most reasent one (Just finished it today) the one in the picture below was made in august this year.
I am really pleased with both of them!


The belt is divided in to two thongs and wrapped around the scabbard. On the back it passes through it self before it goes around the front again.


The two thongs pass under both the belt and the covering on the scabbard. This Is the most tricky part of the whole process because you have to hold the slit open and press the thong through at the same time. And you have to hit the slit on the other side as well.

Also the slits have to be as small as possible, so the thong will stay in place afterwards. If the slits are to bit the thong will come loose.

Also notice that i thinned down the thongs. This gives a bit more room to work with.


The end is folded up under the covering to give a nice round end.
It could also be fitted with a chape to reduce wear on the end, but unfortunately I don't possess the skills to make one.


And here is a closer look at the upper portion.

BTW: The red fabric in the background was the fabric that I dyed at our stay at Spøttrup. I will make it in to a new doublet later.

Thursday, October 22, 2009

Dyeing in the fall

As Mikkel wrote in the last post the Handkraft team have been at two medieval events this October. The two events made it possible for me to do some dyening. At Vitskøl monestary we dyed with madder and mushroms, and at Spøttrup Castle we continued dyeing with madder. Have brought differnt types of yarns which you can see had a great impact on the results of the colours. We also dyed fabric but pictures of this will be saved for another post - this was mostly Mikkels project and I´m sure that he will show it to you later.

From left to right. Light grey yarn in 2. colourbath, white yarn in a bath made with mushrooms, the two next are white yarn in 3. colourbath, a light grey yarn in 3. colourbath, three next is different white yarns in 3. colourbath, and the last is a white yarn in 2. colourbath.

I rally love the colurs that we made. I made sure to make a lot of the really thin embroidery yarn, so that I can experiment with overdyening them with either yellows, greens or indigo. I have tried that in a small scale, with much succes. So now I want to dye some more yarn that I can use or sell.

Sunday, October 18, 2009

Medieval pies


During this last week the authors of Haandkraft were all camped at Spøttrup castle in Salling, Denmark. We had a wonderful week, and got some time to try out a lot of stuff. One thing being cooking some medieval food.
Of course there is no such thing as a truly authentic medieval dinner, but we made some food inspired by sources from the period.

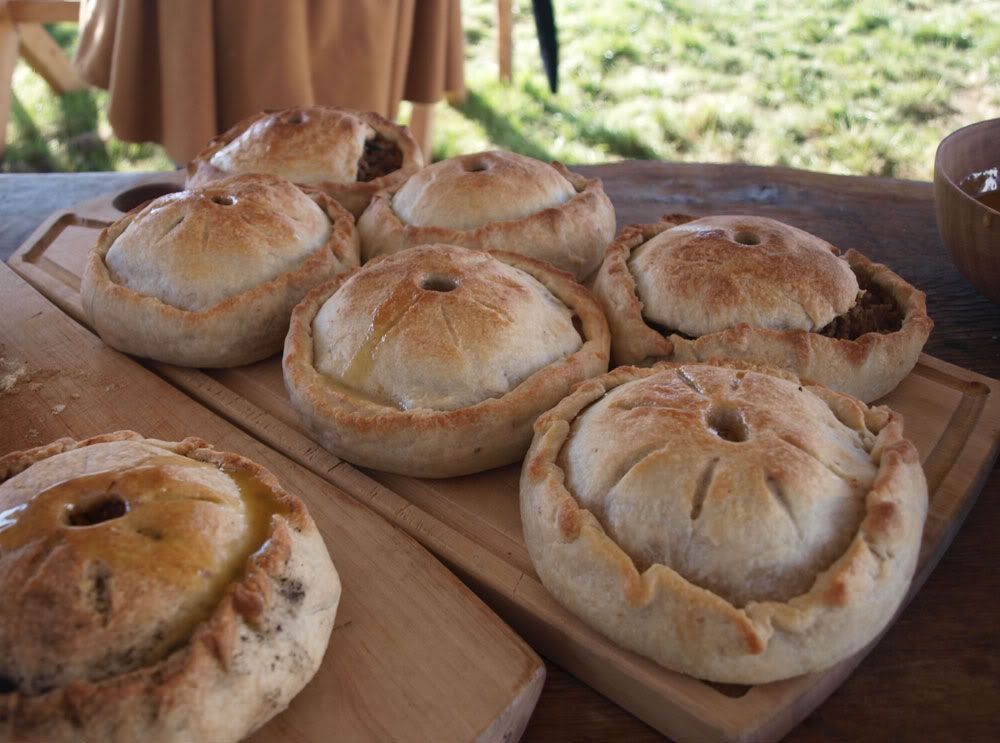
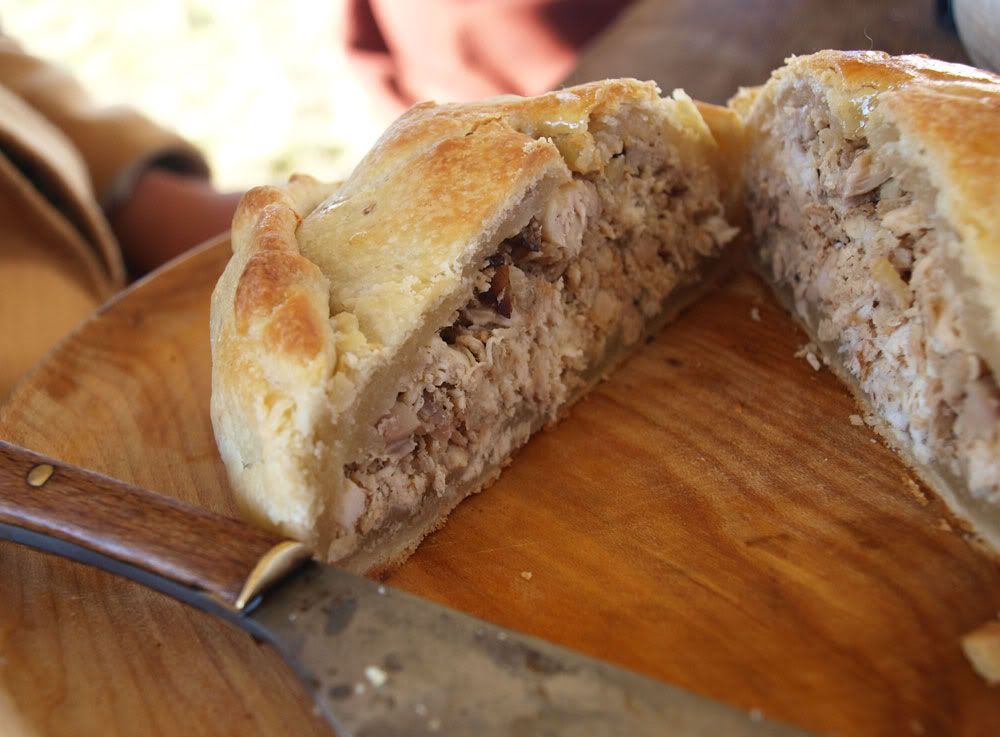
The course that got the best response were the pies, wich I will describe here.
It won't be a specific recipe, as I don't have one. but I will give some pointers in what direction to go.
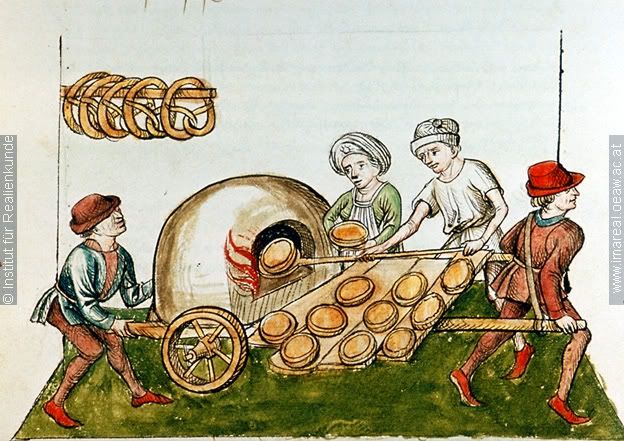

Konzil von Konstanz (ÖNB 3044, fol. 48v), c. 1465-1475

To make pies you first need to make some dough. In this instance we made a so-called "Hot water-crust pastery"-dough, wich is mainly made from flour, water/milk and lard.

500 g wheat flour
2,5 dl water (or half water, half milk)
250 g lard

The water/milk is brought to boil in at pot. When the lard is all molted the liquid is poured into the flour and mixed with a spoon.
After this you should knead the dough until it is uniform and without lumps.
Leave the dough to cool for a while. The cooler the dough the easier it will be to work with. Room temperature should be fine.

We made two different types of filling. One with chicken and one with minced pork and beef.
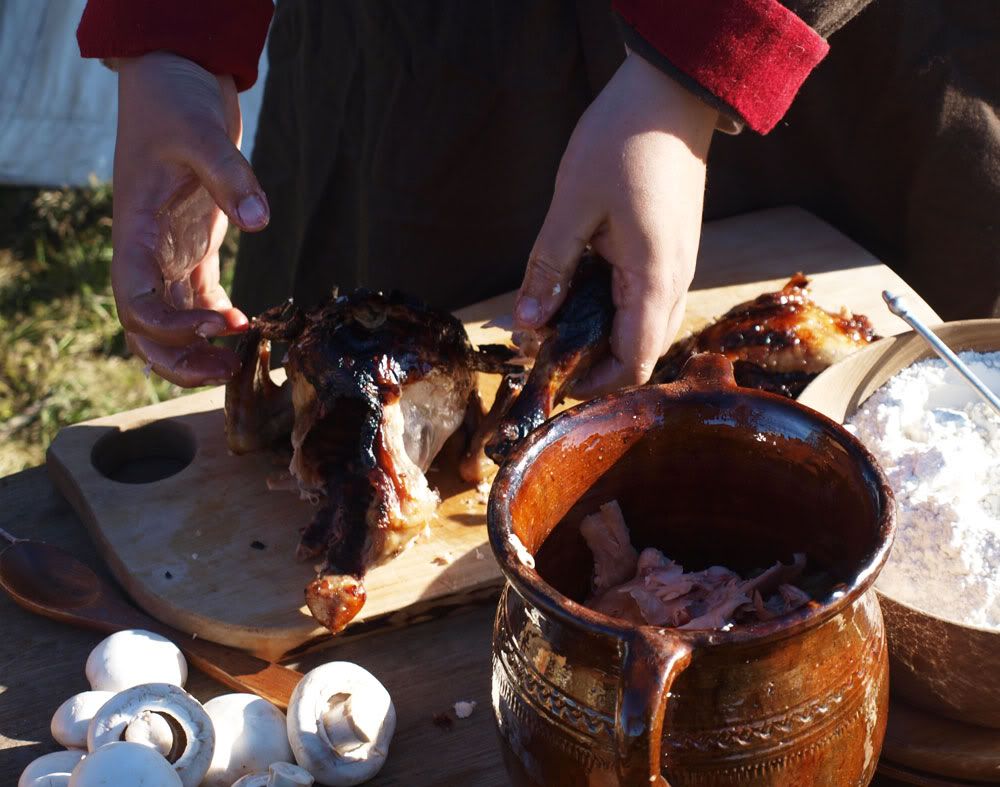


Chicken filling:
Pluck the meat of one cooked chicken and roast it in butter, with some garlick, fresh ginger, thyme and cinamon. Season with salt, pepper, sugar and vinegar.

Pork/beef filling:
Roast some minced pork/beef in butter. Add chopped mushrooms, sage and thyme. Season with salt and pepper.
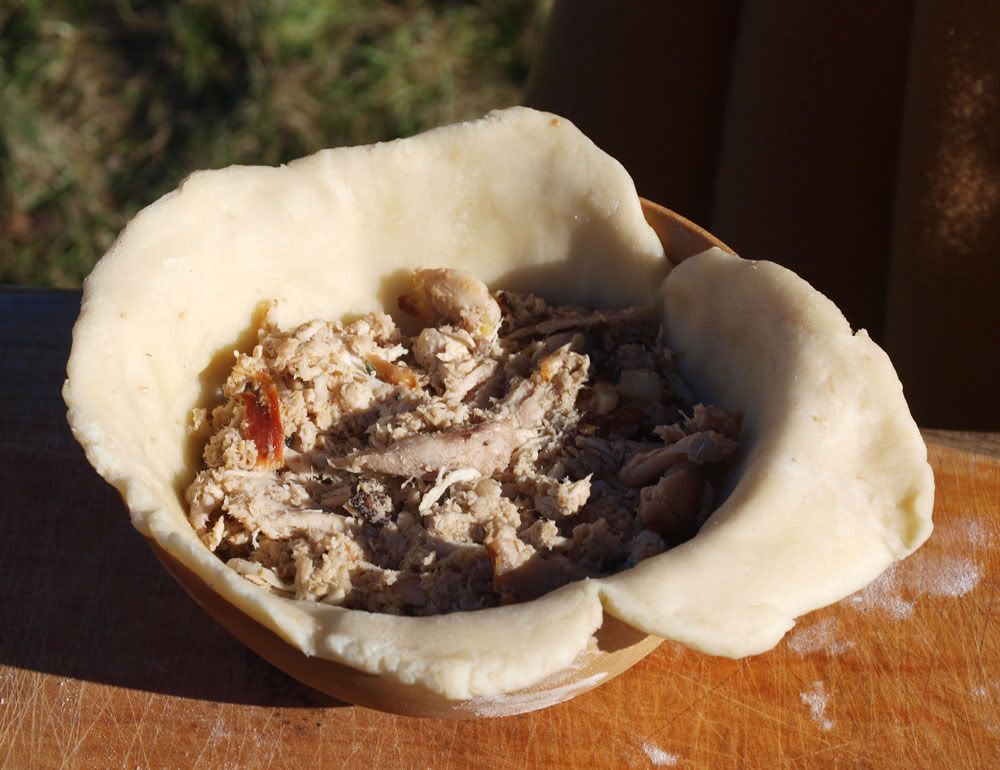
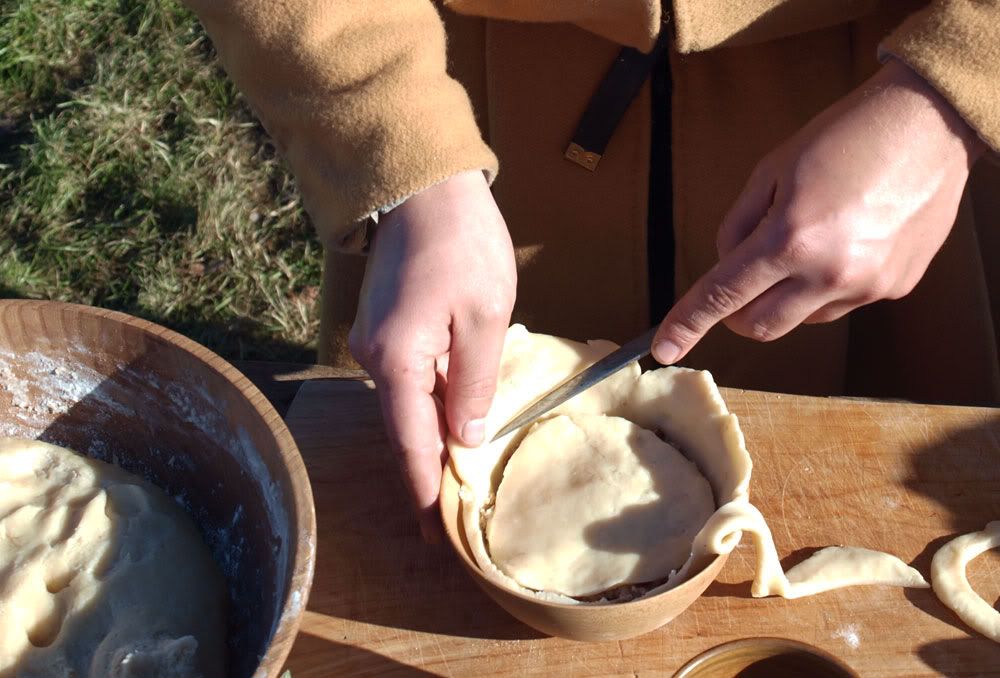
Shaping the pies:
We shaped the pies using a small wooden bowl (ca. 15cm in diameter). First make a flat piece of dough about 5mm thick. Push it down into the bowl so that the edge go over the edge of the bowl, and place some filling in it.


Then make a small disc to cover the filling, and cut the edges flush with the edge of the bowl.


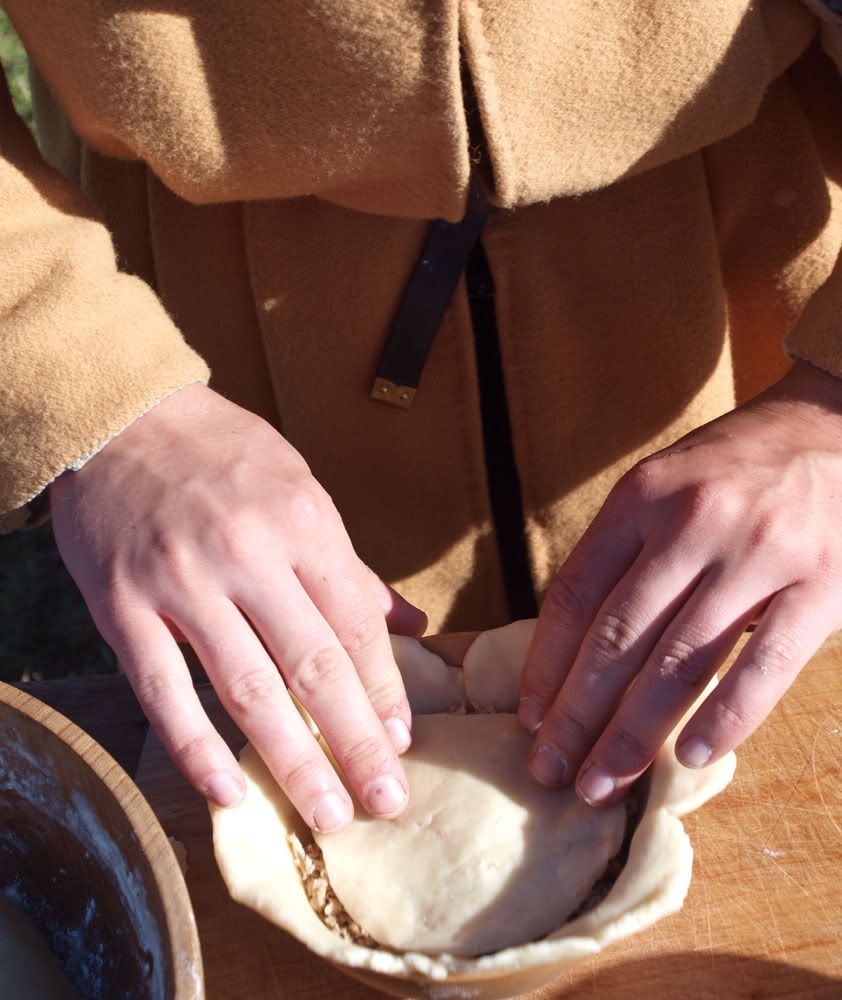
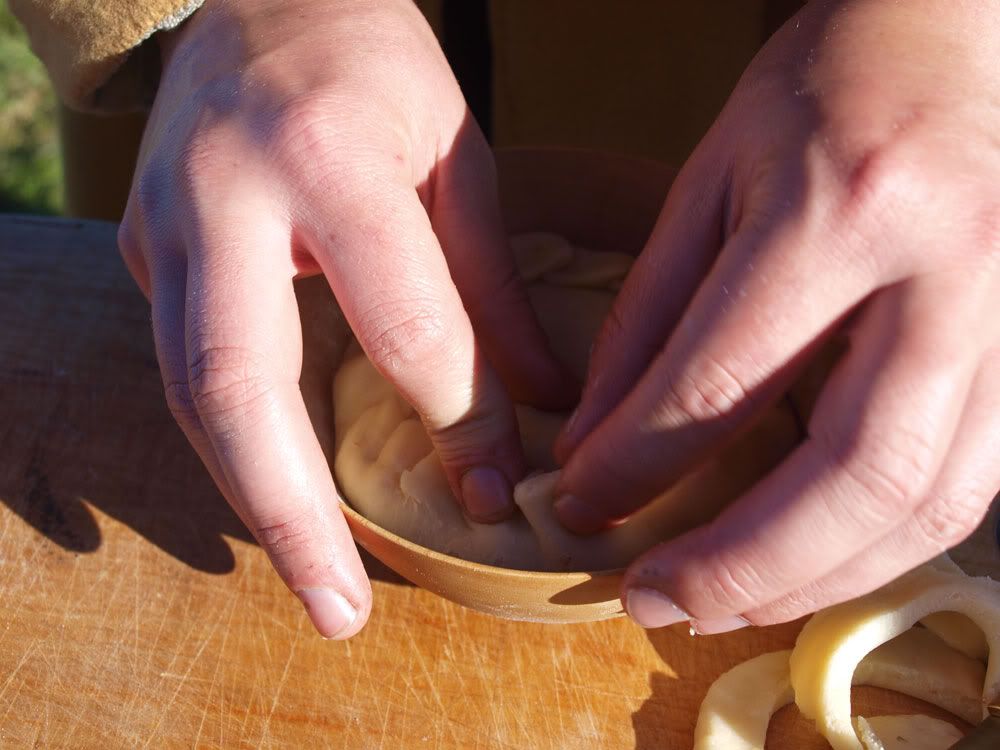
Fold down the edge, and make sure the folds stick in place. If you don't the pie will come open when you bake it. You could probably glue it with egg or water, to make sure it stays in place.


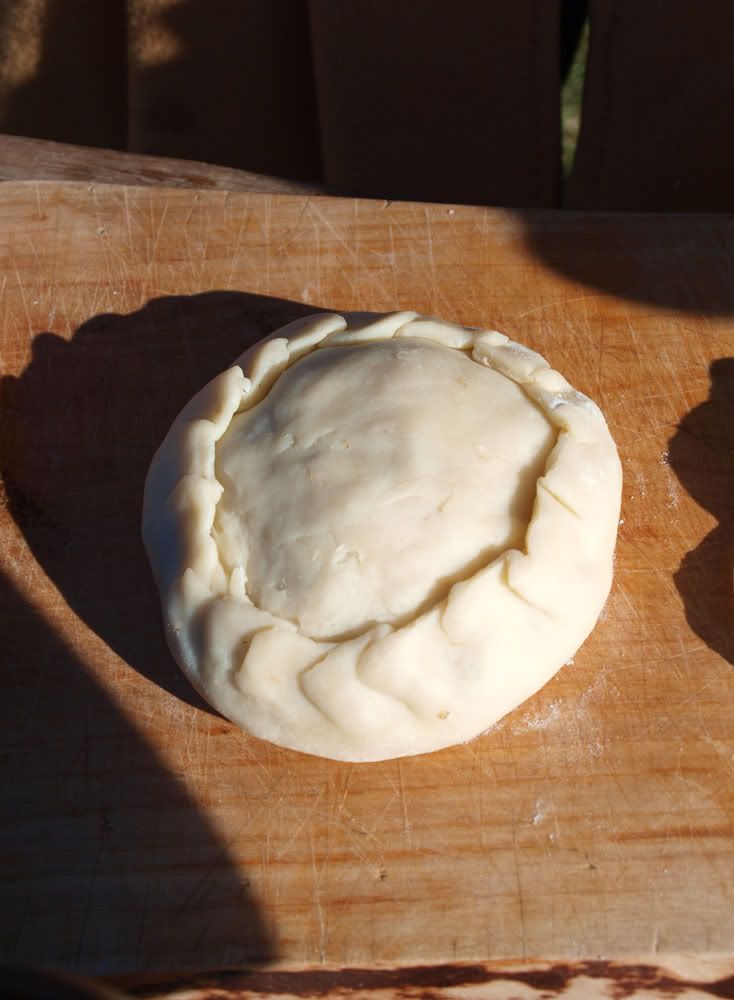
Tip the pie out of the bowl, and poke a small hile in the top.
After the pie has been baked you can pour different kinds of sauces into the hole or seal it with lard or butter.


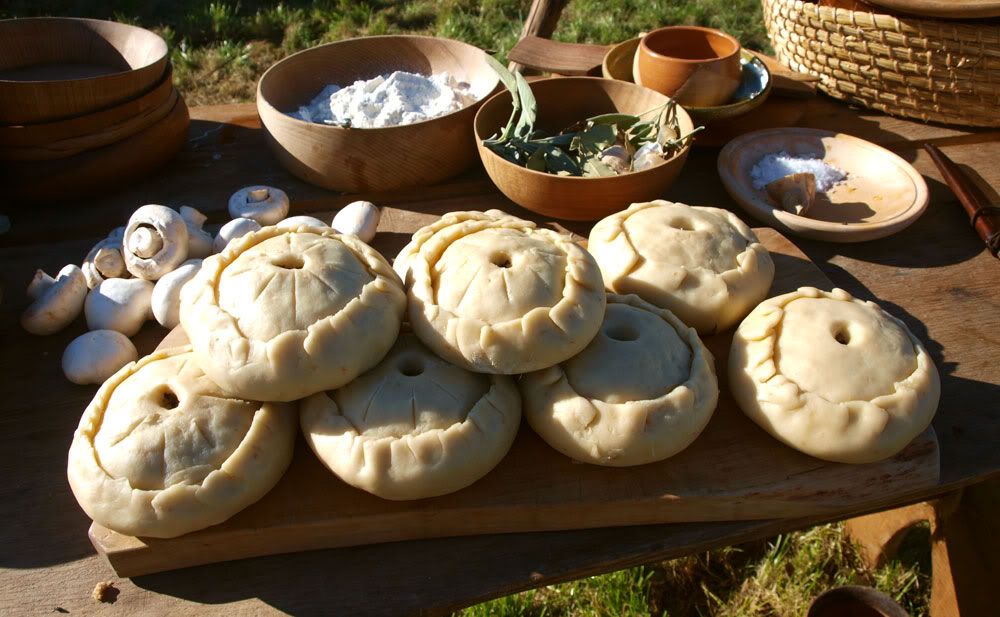
Bake the pies in the oven until thay are golden brown. In a normal oven that will be somewhere around 30 minutes at 200 degrees (celsius).

We had a butter and honey sauce with these.
Equal parts butter and honey melted togeather in a small pot and seasoned with a pinch of salt.


Enjoy! (I know we did)

Thursday, September 24, 2009

A treatyse of fysshynge wyth an Angle


Sometime a couple of years ago I came across this text somewhere on the internet. I have read it several times and thought that I would recomend it to all you reenactors out there.

It is nothing less than period instructions to making, fishing rods, lines, hooks and catching bait.
The original text was first printed in 1496. And I believe that I have read somewhere that the text was written sometime in the earlier (around 1465).
Additional info can be found HERE.

What I really like about the text is the very detailed instructions on how to make a variety of items that the fisherman needs. Not only the preparation of the rods, but also how to make hooks from needles, how to make lines from horsetail-hair (and dye them in the correct colours), as well as where to find the correct worms and other animals for bait.
Even tools and matierals are described thoroughly.

The entire text can be read here: http://www.uoregon.edu/~rbear/berners/berners.html


Sunday, August 23, 2009

Another ladies purse

Just this weekend I finished another ladies purse. It is basicly the same design as the last one. This new one has two pouchlets, rather than just one and it is a bit larger. The pouch measures 20 x 20 cm.


I also found this picture from the Mendel Hausbuch at this fantastic site: Die hausbücher der Nürnberger Zwölfbrüderstiftungen
(It contains a great amount of 15th century craftsmen (as well as 16th and 17th century craftsmen))

A purse very similar to the one I made lies on the table.

Things that I have been doing this summer

I´m very sorry that I have been absent from the blog in quite a while but there have been so many things going on this summer. Although I have been busy I havn´t stopped making different medieval things. It is things that you have seen mentioned before on the blog and there is at the moment no new and exciting projects with need of source pictures and such. So this post is going to be pics of different things and opbjects that I have been working on/with. Sometimes much reading in a post isn´t always the best. So at the moment I´ll leave all the writing to Mikkel :0).


Working on my embroderi (which is now finished, and will be shown in a upcomming post)


Dyeing in an iron cauldron.


Here I´m washing the yarn that have been dyed with Saint John's Wort (on danish it´s called perikon)


Here are some of my dyes - the small bundles are embroidery wool which I sell on the markets that we attend. So fare there haven´t been much luck in the sales.


And this...I just had to show you that I have been so lucky to have tried to hold such a wonderfull bird :0)

Pattens

Tha last project I did at Voergaard was a pair of pattens. They were made purely out of necessity, as we had a lot of rain that week.

They are made from alder (Alnus glutinosa), which was cleft and worked from the still fresh wood.
Alder will get very light when it dries, so the pattens won't be too heavy. Poplar or willow would also do just fine for pattens.

The most important thing about making pattens is to place the raised wedges in the right position, so it won't hinder the movement of the foot.
They need to be places right under the heel and right where the toes bend when you take a step.


And I really recomend people using medieval shoes (with leather soles) to get a pair of pattens!
They keep your feet warm and dry, and they make a fabulous noise when walking on cobblestone pavements :-)

Thursday, July 23, 2009

15th century girdlepurse

At Voergaard I also made a girdlepurse.

The most interesting feature on this purse is the decoration on the flap. I have never made a purse with a decorated flap before, so this was something to try out.

The decorarions are made using an awl, but later I will try using a wooden board with some carved lines, and press the leather into those. Hopefully this will result in deeper lines.

Photobucket

Photobucket

Photobucket

Wednesday, July 22, 2009

Early 16th century ladies pouch purse

During our (Louise and I) stay at Voergaard castle I was asked by a friend of Louises to make a ladies purse.

I remembered seeing some pictures of the so-called "Pouch purses" in Purses in Pieces, so I thought that it could be an interesting project.

The pouch purse is a fairly simple type of purse. It consists of a pouch og "bag" of variable size and a strap to attach it to the belt. The pouch is drawn shut with a drawstring and the flap is held down with a sort of "button".
Smaller pouchlets can also be attached to the main pouch.

This type of purse can be seen on several pictures from the early 16th century. For example this picturen from 1500-1501 by Dürer.

Photobucket

And here is my interpretation of a pouch purse.

Photobucket

The pouch measures ca. 15 x 15cm and is made from very soft cow-skin, 0,6-0,8mm thick. The strap for the belt is ca. 20 cm long and made from 3mm cow-skin. The drawstrings and the edge og the belt-strap is made from goat-skin, ca. 1mm thick.
The glass beads are hand made (not by me though).

Photobucket

In the picture by Dürer the flap does not look like it is held down by stiching, so I decided to leave it. Even though the flap is not stiched down it sits well on the belt.
The weight of the purse doesn't seem to be a problem.

Photobucket

A close-up of the button and reinforcement of the holes for the drawstring.

Photobucket

And this part of the purse is what I am perhaps the most pleased with. I really enjoyed making these stiches. And I think they look great :-)

Photobucket

The back of the purse. The drawstrings are held in place bu a knot on the backside of the belt-strap.

And here is how to sew a strap on the edge of a piece of leather. Is also looks great on shoes!

First sew a strip of leather on to the front of the edge. Sew it on front-to-front. The distance from the edge to the stiches determines the with of the decorational edge.

Photobucket

Then turn over the leather strip and sew it to the backside, with stiches that doen not go through the front side of the leather.

Photobucket

All it takes is a bit of cencentration, and it looks great :-)

- - - - - - - - Update! - - - - - - - - -

I also found this picture from 1503. Artist unknown.