In my last post I mentioned some "advanced stuff" that I was working on.
Well now it is done and I can finaly show you some pictures of what I have been doing.
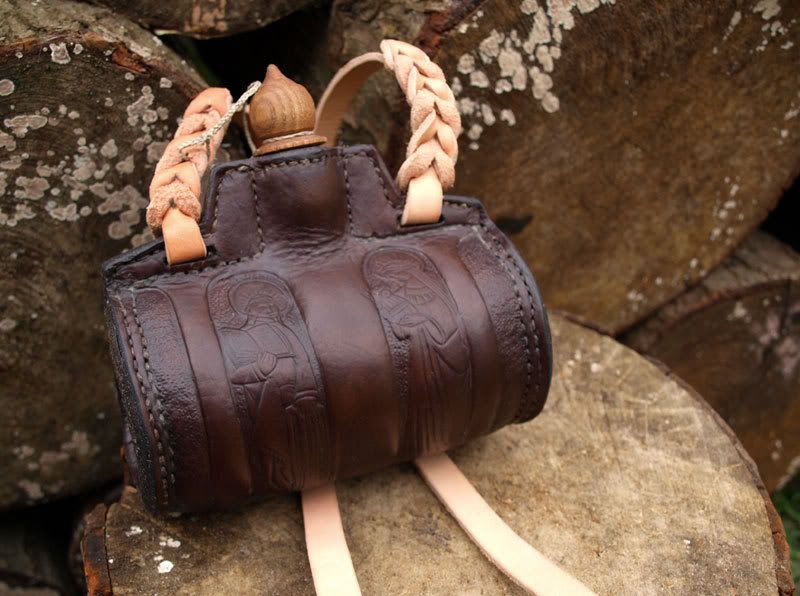
This time it is a leather drinking bottle (also called a "costrel"). It is a bottle made from relatively thick leather (I used 2-3mm vegetable tanned leather) that has been sewn togeather, and lined with pitch (A cripy, yellowish resin derived from pine-trees) or beeswax (wich I used).
The costrel is decorated with pictures of saints that I copied from some very nice frescoes in
Sahl church. A small church situated near Vinderup here in Denmark.
The frescoes are from ca. 1500... give or take a couple of years...
- Front and back of the bottle. The cork is made from oak.
Some of the edges of the costrel consist of several layers of leather. The top of the bottle where the strap is attached is made from 4 layers. The sides are made from 3 layers and the "mouthpiece" is made from 2 layers. The thick edges help to waterproof the seams, and the seams were actually almost watertight before I coated it with beeswax.
All seams were done with a double thread. Otherwise the thread would tear through whilst sewing with it.
- This is the bottle before I cut the holes for the strap end dyed it.
The extra layers only cover the seams, and does not extend more than a couple of millimeteres into the inside of the bottle.
When I cut the pieces to be sandwiched between the outer layers of the top the costrel I only cut the size to fit the inside of the bottle. When I have sewn them in place I trim down the excess. This makes it much easier to get a nice finish on the edges (I also sanded the edges with some sandpaper to get a nice even surface, and to remove some bad cuts that I made)
In the sides of the bottle I just insert a band of the same with as the seam allowance.
- The overlapping cut of the band and the inside of the bottle.
The band that I have sewn in to the sides and the mouthpiece are both cut exactly to size, and the edgs are cut at an angle to make a tighter seal.
The side piece is an almost "pearshaped" piece, that is pushed into the side of the bottle, while holding the "welt" or band in place. This is a bit tricky, and maybe it is easier to just start sewing in one side and then fit the side piece into place as you go...
Start by sewing the inmost seam.
Also I should be mentioned that the shape of the side piece determines the shape of the bottle. So if you want a flat bottom for the bottle to stand on, the end of the side piece should have a flat bottom too.
- This is the side of the bottle after the side piece has been sewn
in place (and the edges have been trimmed off).
When I had finished sewing the bottle together I dyed it with wallnut shells (as explained in an earlier post), rinsed it under running water and, stuffed the (still wet) bottle with dry sand.
You really have to force in the sand to get it tight enough to expand the leather. I used a funnel and the wide end of a chopstick to do this.
The bottle won't get much bigger, but it should expand a bit.
It is important to really pack the sand tightly in the bottle, beacuse makes it easier to mould the ornaments later on.
Now the bottle should be left to dry, for a day or two or until the leather has become completely dry.
If you want to do some ornaments on the bottle it should be done now... If not, it is ready to be sealed with wax.
 - The braid on the strap.
To seal the bottle you need some beeswax, a hot oven, a small paint brush and a pot for melting the wax. First melt the wax. I do this in a pot directly on a hotplate and it works fine a long as you make sure that the wax won't burn the leather. Do this by holding a small scrap of leather into the molten wax. If it starts bubbleind around the piece of theater the wax is too hot. If no bottles can be seen the wax is fine.
The molten wax is then poured into the bottle and slushed around the entire inside of the bottle. Especially the seams!
Do this a couple of times till you feel sure that you covered everything.
Maybe the wax will start seeping through the leather and turning the colour darker. This is ok!
Now put the bottle in the oven and turn it on (Ca. 100 degrees celsuis). When the bottle is heated the wax will start seeping through the leather (this happens because all the pores in the leather are filled with wax)
Turn the bottle around a couple of times so that the leather sucks up all of the molten wax inside the bottle. Most of the bottle (maby exept for the edges) will turn dark.
The places that doesn't absorb the wax can be painted with molten wax from the pot, using a brush. Put the bottle back in the oven so the wax can be absorbed.
When the bottle has become dark all over it should be left to cool.
When the bottle is cold, puur in some water to make sure it is watertight. If it isn't you should pour out the water and let it dry. Then pour in some more molten wax and make sure it sets in to the seams.
This should do the trick! (If not try rubbing some soft wax in to the leaking places).
Now your costrel should be done, watertight and quite hard.
The leather turns almost plactic-like when it is saturated with wax. It shouldn't be necessary to grease the bottle itself. This might even dissolve the wax.
Now all that's left to do is attaching the carrying-strap. You can sew it in place or make a braid like the one I did.

 -Pictures of the four the frescoes from Sahl church.