I found this fantastic page just yesterday: University of Iowa libraries bookbinding models digital collection
It is a collection of examples of different types of bindings sorted by types and historical periods. The site contains numerous pictures og the bindings from different angles.
This makes it very easy to see the different techniques used in the binding of books.
The site show both bound books and the structures that are normaly cowered by the leather binding (the wooden boards and the thongs that attach the pages to these boards).
Especially the "medieval" and "monastic" sections are really interesting!

Sunday, March 29, 2009

Saturday, March 28, 2009
Purse from Dordrecht
Another purse finished!
This purse is also depicted in "Purses in pieces" and was found i Dordrecht (Holland).
The front compartment has its opening on the inside of the front flap. And this time i decided to make the front compartment from textile, rather than leather.
the description of the purse said thet the front compartment had been made from either chamois or textile.
I used unbleached linnen canvas.
(BTW: If you know where to get good quality chamois. Please tell me!)

The reason why I wanted to make this purse is the three pouchlets.
They are made from a single piece of leather. All the other purses I have made have pouchlets made from seperate pieces.
I think this solution gives the purse a much simpler look.


The dye that i used for this purse is the same that i used for the Nieuwlande-purse.
Thats two purses done. Now theres only two more to go :-)
This purse is also depicted in "Purses in pieces" and was found i Dordrecht (Holland).
The front compartment has its opening on the inside of the front flap. And this time i decided to make the front compartment from textile, rather than leather.
the description of the purse said thet the front compartment had been made from either chamois or textile.
I used unbleached linnen canvas.
(BTW: If you know where to get good quality chamois. Please tell me!)
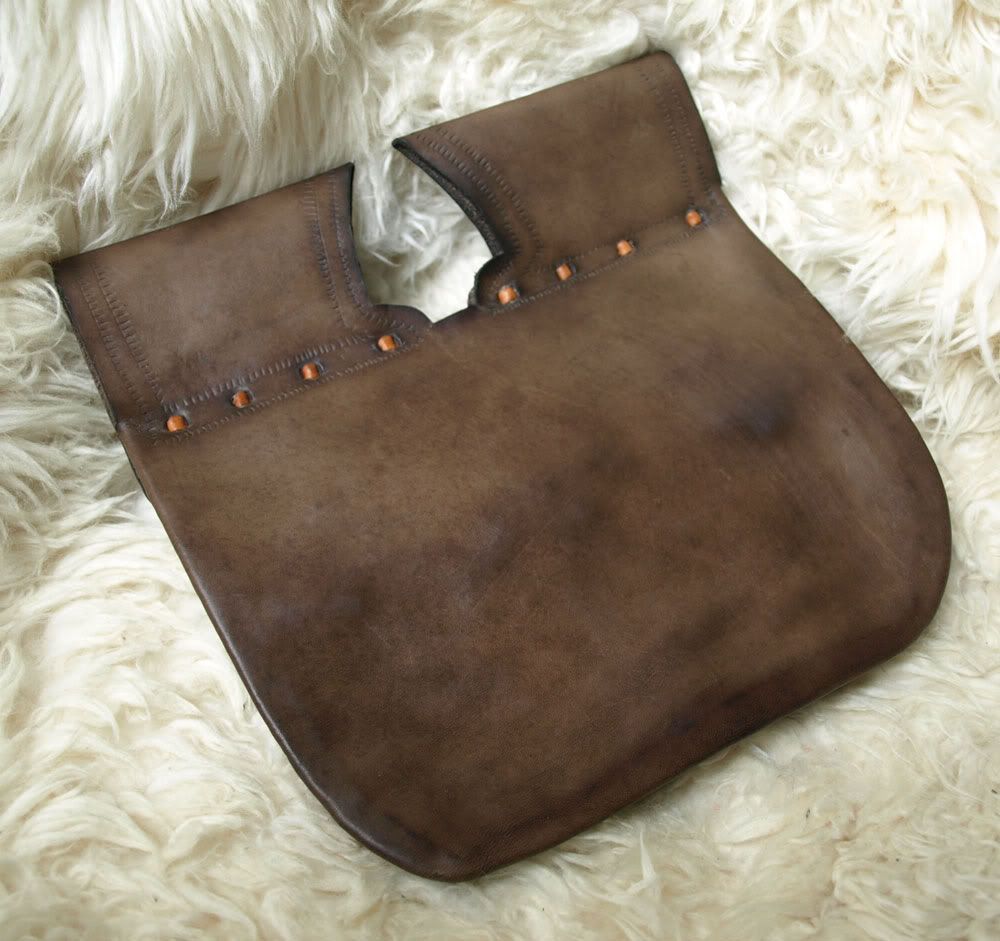
The reason why I wanted to make this purse is the three pouchlets.
They are made from a single piece of leather. All the other purses I have made have pouchlets made from seperate pieces.
I think this solution gives the purse a much simpler look.
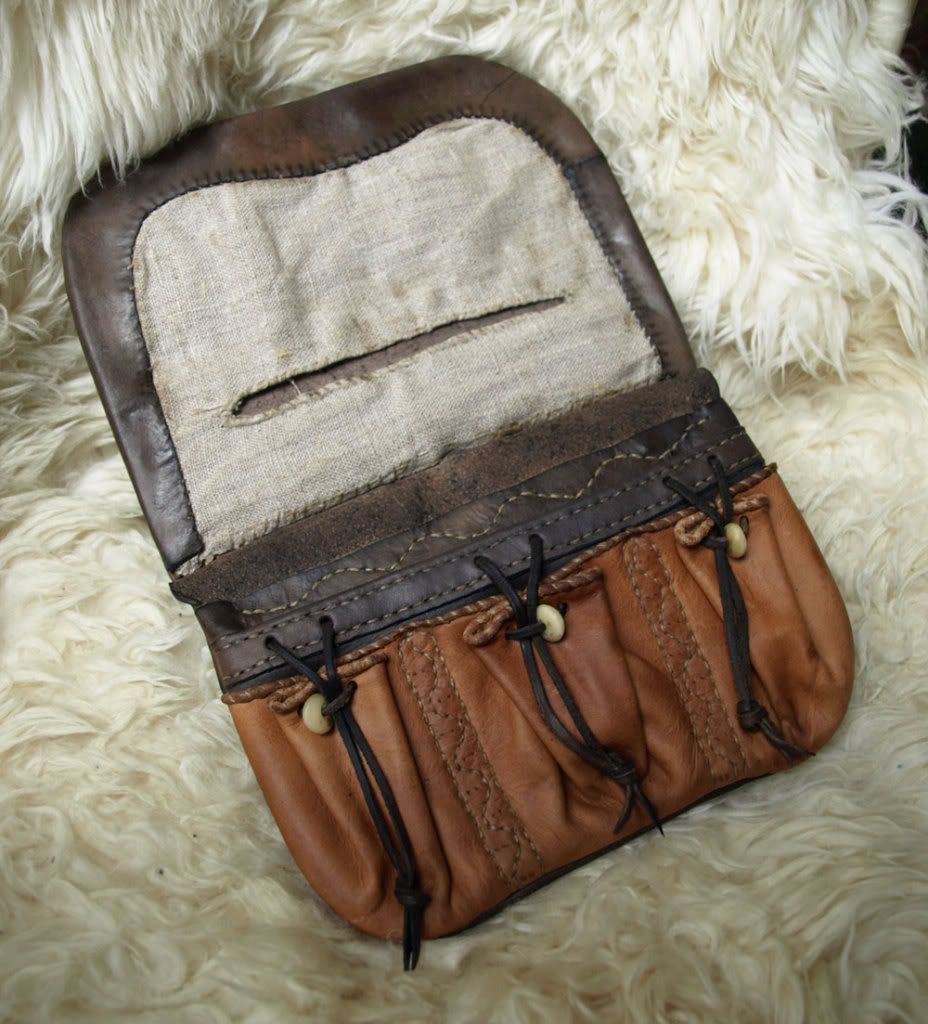
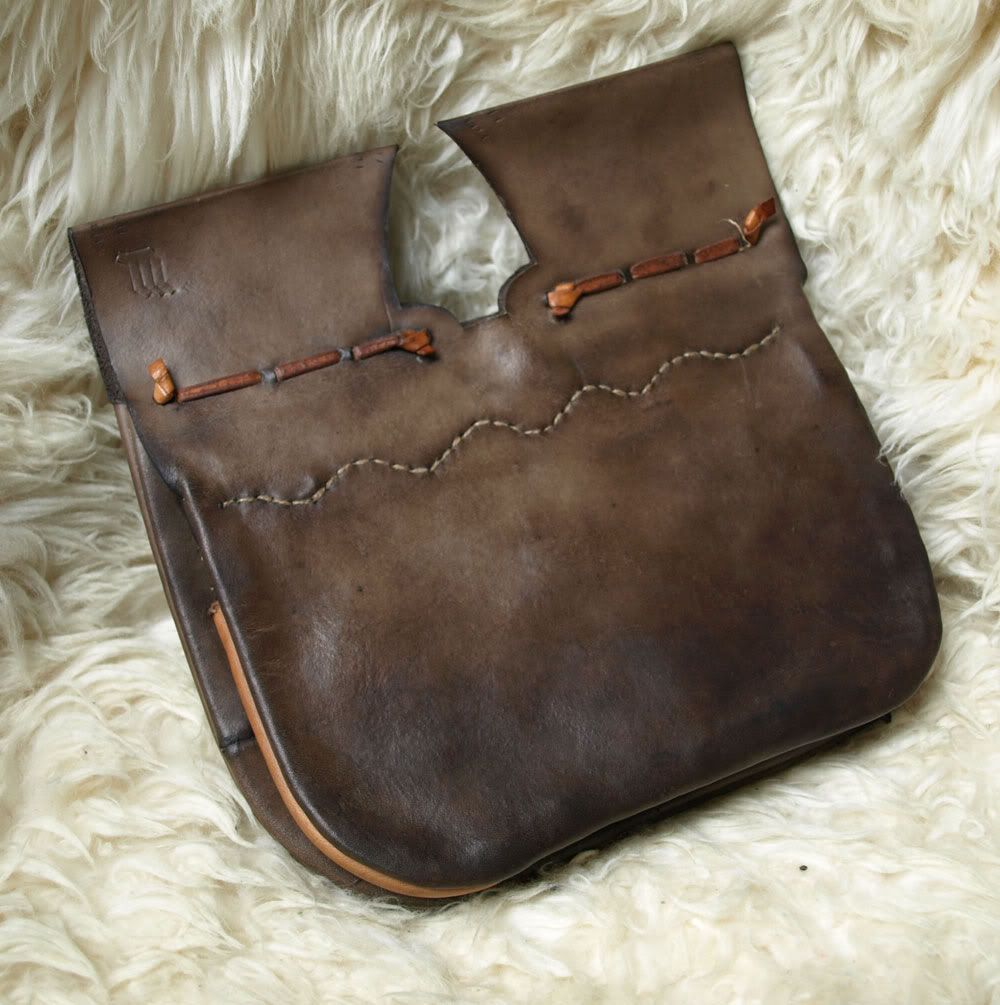
The dye that i used for this purse is the same that i used for the Nieuwlande-purse.
Thats two purses done. Now theres only two more to go :-)
Friday, March 27, 2009
Bookbinding
I have been facinated by bookbinding for at least a couple of years now, and I have wanted to do something serious about it for just as long.
So, yesterday I bought some second-hand bookbinding tolls. Now I can't wait to get to work, making some books!

These are the items that I bought.
From left to right: Sewing press, Cutting press and a "plough".
Descriptions on the function of the different tools will be given as I get to try them out.
I think that these tools should be suficcient to get me started. Now I just need to find some sources on medieval bookbinings (It has to be medieval of course).
Sources for the binding of books aren't exactly numerous on the internet, but I have manageded to find some:
Bookbinging.net
Medieval manuscripts on-line
And this fantastic site:
Hand bookbindings from Princeton university library
I will also use this oppotunity to post some pictures of a project that I finished sometime around July last year:

The book is made using techniques that are at least inspired by medieval bookbinding. I was not in posession of the correct materials for the project, but it gave me some interesting insight into the processes that go into making a book.
I think it came out pretty nice... Authencic materials or not :-)

The pages should have been parchment, the binding should have been oak boards, and the leather should have been thinner.
The technique for joining the pages to the cower should be pretty historicly accurate though.
Hope to show you more books soon!
So, yesterday I bought some second-hand bookbinding tolls. Now I can't wait to get to work, making some books!
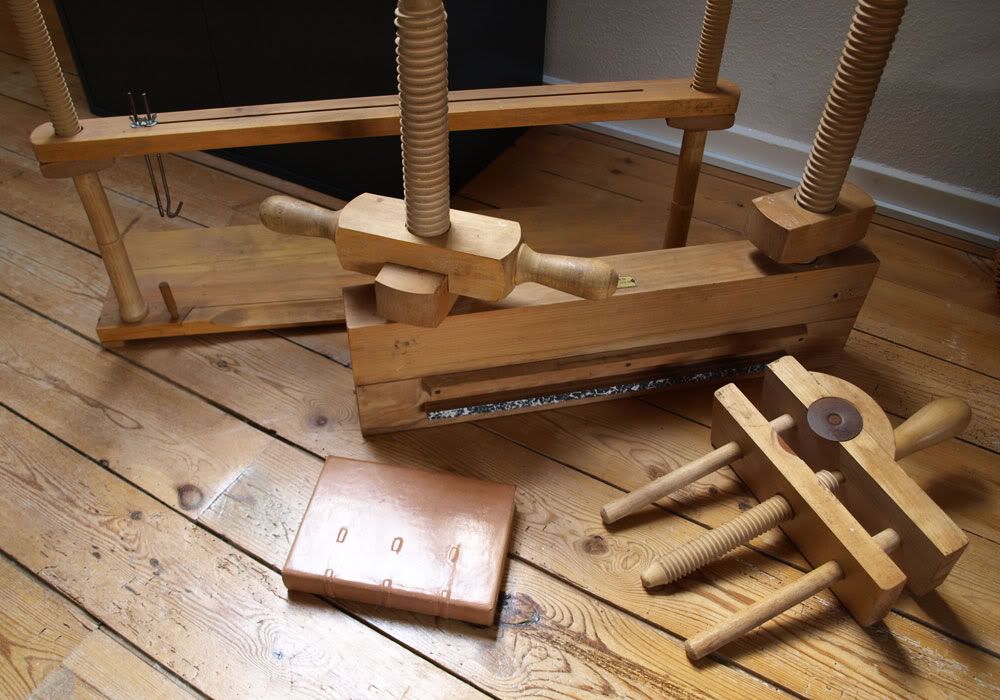
These are the items that I bought.
From left to right: Sewing press, Cutting press and a "plough".
Descriptions on the function of the different tools will be given as I get to try them out.
I think that these tools should be suficcient to get me started. Now I just need to find some sources on medieval bookbinings (It has to be medieval of course).
Sources for the binding of books aren't exactly numerous on the internet, but I have manageded to find some:
Bookbinging.net
Medieval manuscripts on-line
And this fantastic site:
Hand bookbindings from Princeton university library
I will also use this oppotunity to post some pictures of a project that I finished sometime around July last year:
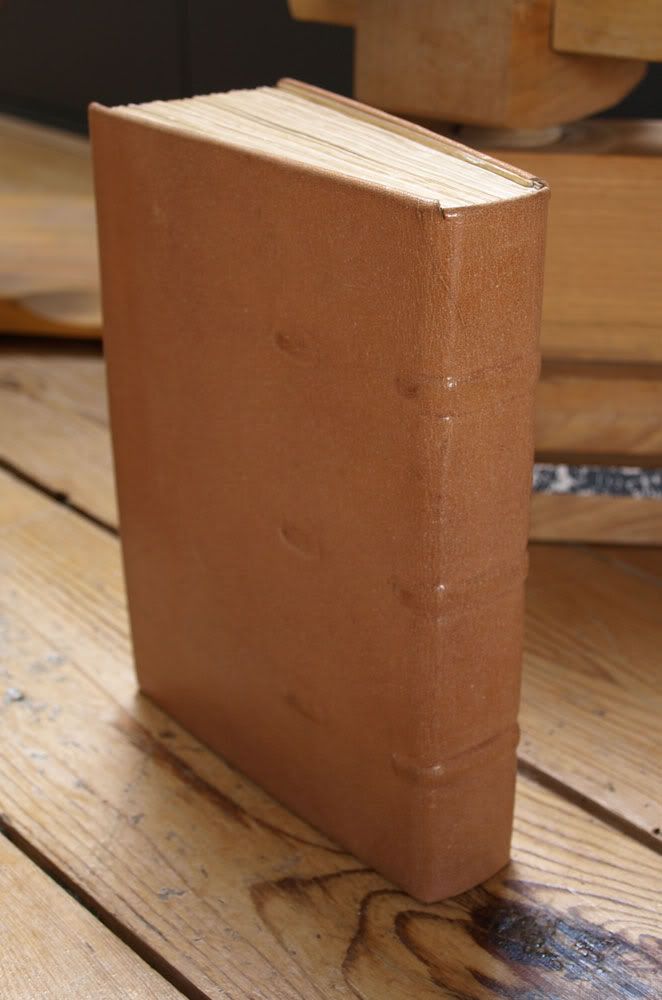
The book is made using techniques that are at least inspired by medieval bookbinding. I was not in posession of the correct materials for the project, but it gave me some interesting insight into the processes that go into making a book.
I think it came out pretty nice... Authencic materials or not :-)
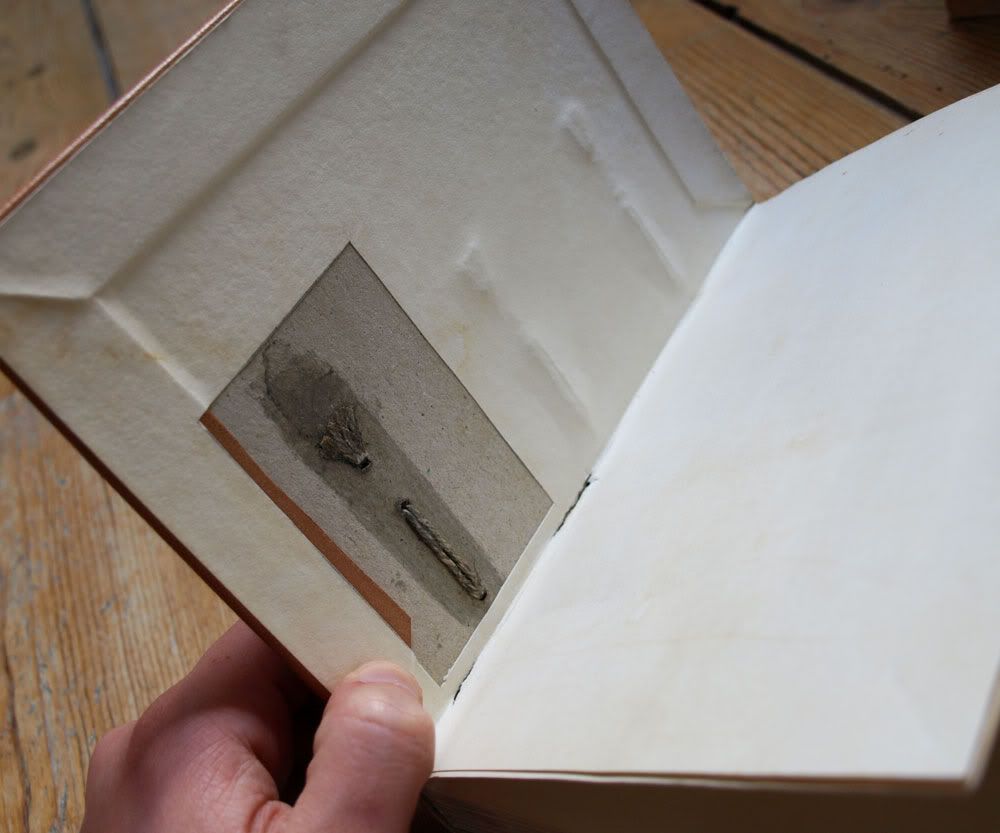
The pages should have been parchment, the binding should have been oak boards, and the leather should have been thinner.
The technique for joining the pages to the cower should be pretty historicly accurate though.
Hope to show you more books soon!
Monday, March 23, 2009
Purse from Nieuwlande
Time for another purse! :-)
This time it´s a find from Nieuwlande (Holland), and based on drawings from "Purses in pieces" by Olaf Goubitz.
I can't supply you with a dating of the purse, as the author does not provide one. All I can say for certain is that it is medieval... Late medieval that is.
I decided to make this one because I really like the stabbed decoration and the shape of the girdle loops (or rather the space between them).

The binding is a typical split seam and the front compartment opens to the front of the purse rather than on the inside.
The leather was coloured using a mixture of iron and oak galls. The result is a nice bronwnish black.
After compleation the purse was greased with a mix of tallow, beeswax and pine tar. This gaves the purse a pleasant smokey odour.

On the inside are 3 small pouchlets.


And here you can see the opening to the front compartment.
The things that weren't preserved from the original are: The binding, the front flap, the pouchlets and the dravstrings.
Therefore these things might not correspond with the original purse. These parts of the purse are therefore based on guesswork - I hope that I have come close.
This is the first of 4 purses that I am currently working on. So there is more to come!
This time it´s a find from Nieuwlande (Holland), and based on drawings from "Purses in pieces" by Olaf Goubitz.
I can't supply you with a dating of the purse, as the author does not provide one. All I can say for certain is that it is medieval... Late medieval that is.
I decided to make this one because I really like the stabbed decoration and the shape of the girdle loops (or rather the space between them).
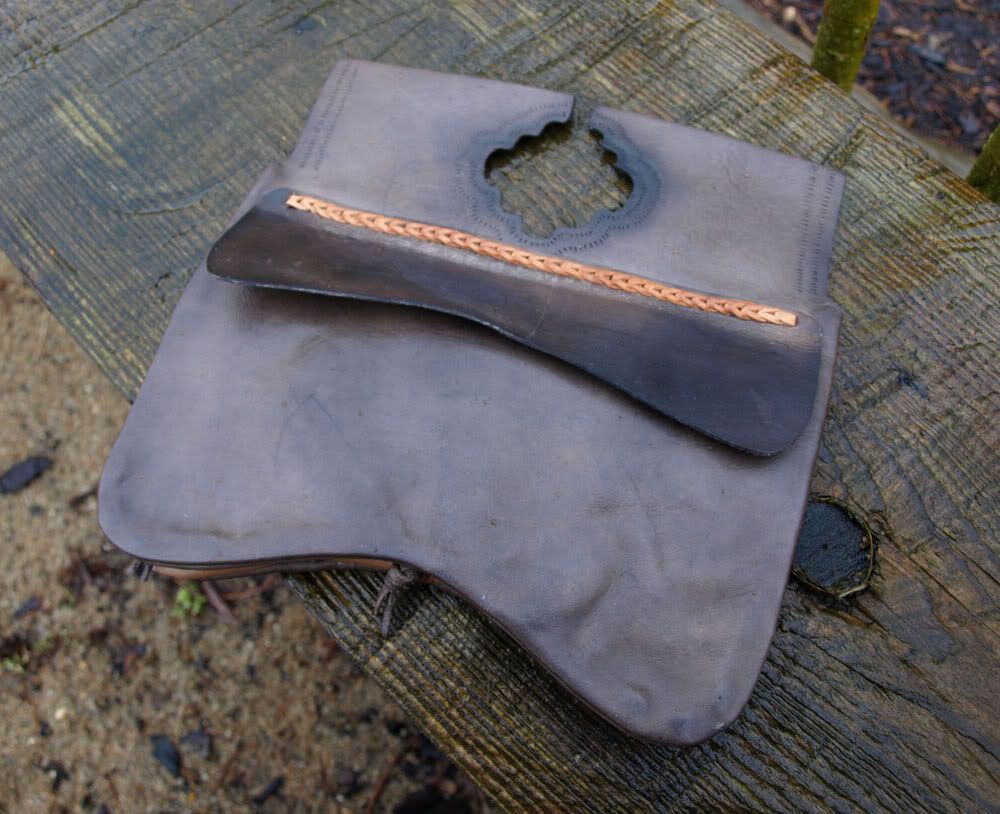
The binding is a typical split seam and the front compartment opens to the front of the purse rather than on the inside.
The leather was coloured using a mixture of iron and oak galls. The result is a nice bronwnish black.
After compleation the purse was greased with a mix of tallow, beeswax and pine tar. This gaves the purse a pleasant smokey odour.
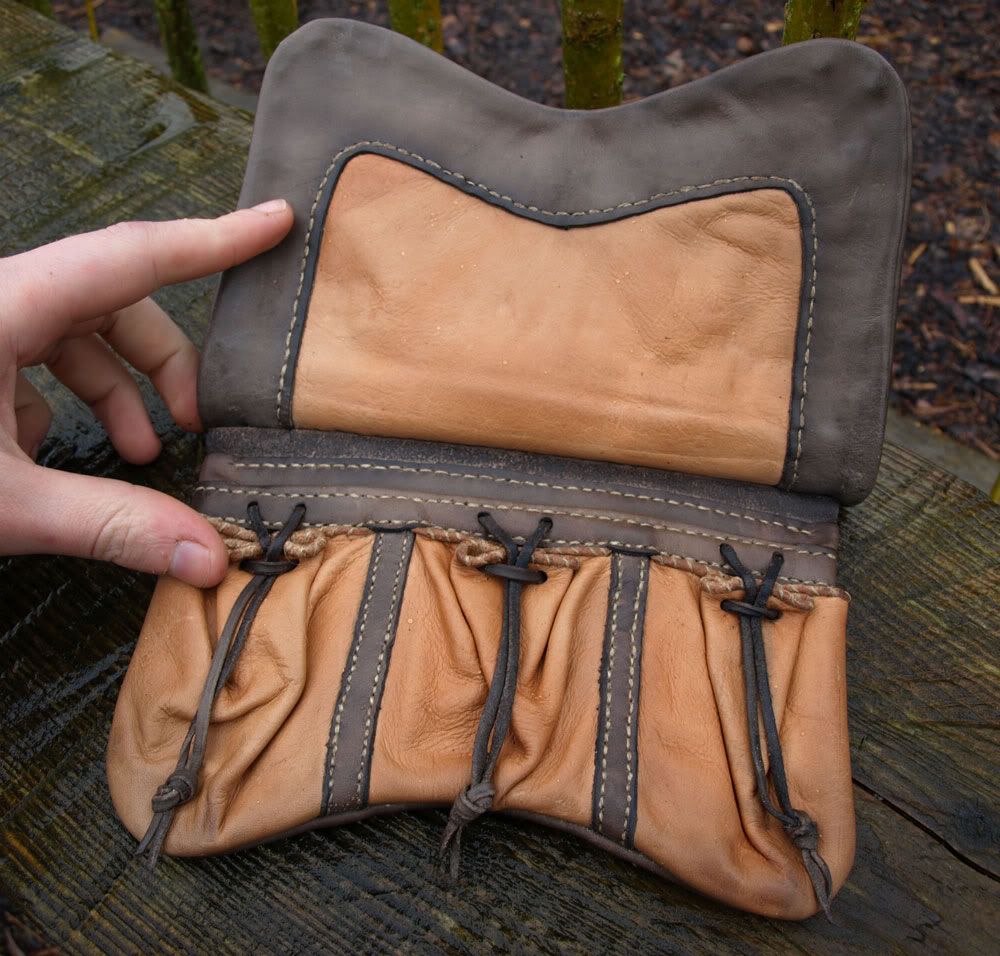
On the inside are 3 small pouchlets.
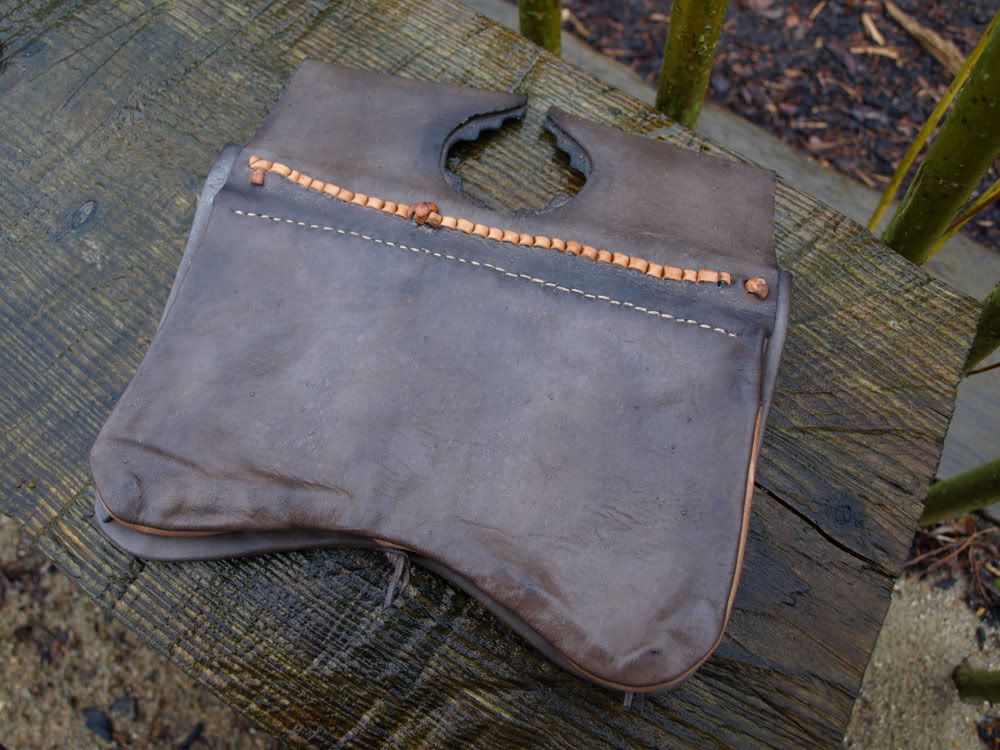
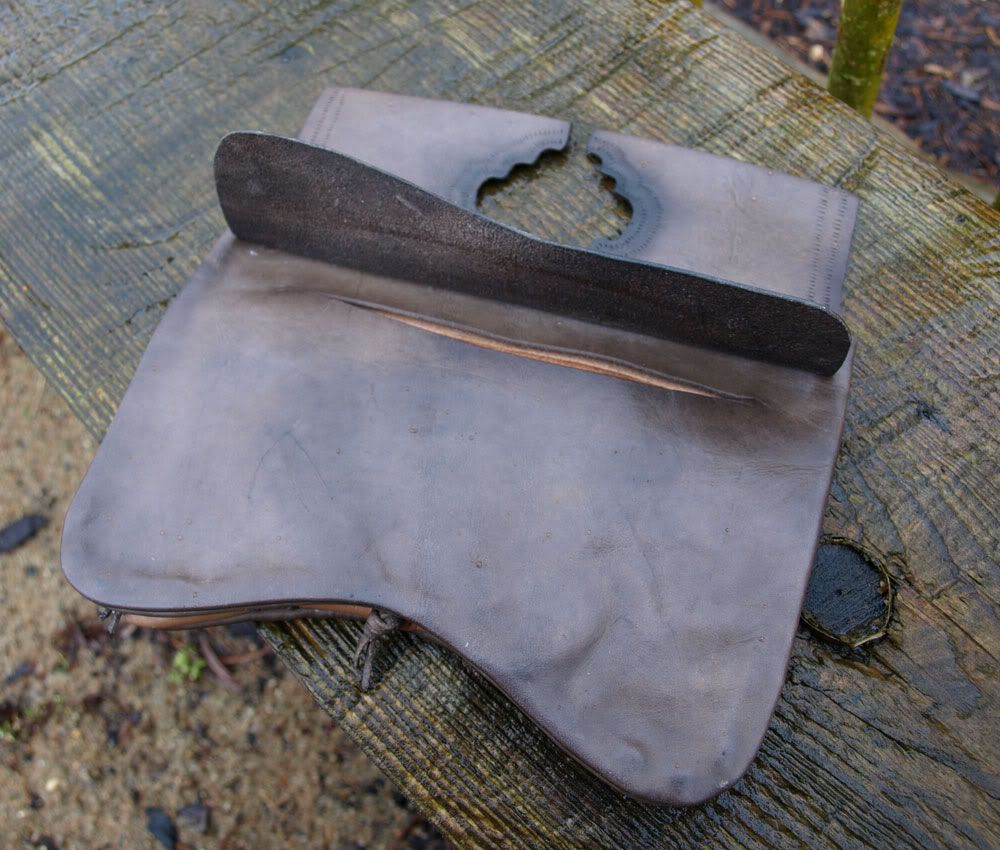
And here you can see the opening to the front compartment.
The things that weren't preserved from the original are: The binding, the front flap, the pouchlets and the dravstrings.
Therefore these things might not correspond with the original purse. These parts of the purse are therefore based on guesswork - I hope that I have come close.
This is the first of 4 purses that I am currently working on. So there is more to come!
Monday, March 16, 2009
Projects in the making
As we have a whole lot of projects, but no finished items, we thought that a post about all of our "works in progress" would be in order.
There are a lot of things that needs to be done before we can be ready for this years season. First of all we need to sew a tent and make poles and tentpegs. Thats the major project.
Besides that we need to make some furniture (tables and benches) and some lanterns.
We bought the fabric for the tent a couple of weeks ago and are currently working on the "blueprints" for the whole thing. We should be ready to start cutting the fabric any time now.
The tent will be a so called "Norman style tent" and it will be 4m wide, 3m tall and about 6m long.
It will look something like this <-- Link to www.Matuls.pl
The "normann tent" should be a nice tent for both sleeping and shopkeeping. And we are going to partition the tent in at least one end, to make room for sleeping.
We also need some new clothes! So yesterday we went to visit some nice "vikings" living in Fillerup (a small town near Odder, where we live). They have a small shop dealing in all kinds of re-enactment goods, like fabrics, rope, whetstones and all sorts of other materiale. We bought some very nice 2/2 wollen twill and some woll thread. The quality is very nice and it has that sweet wollen smell :-) Here is a link to their shop: http://www.glaipnir.dk/
The fabric and thread should be coloured and sewn into a pair of footed hose and a new bocksten kyrtle.

The checkered fabric is for Louises' new dress. A late 14th century dress based on London findings and with fabric buttons. This will be her fist 14th century dress and she is quite looking forward to making it. The plan is also to make a new apron with smock, a head veil with frills and a new underdress without sleeves. So there are much to work on.
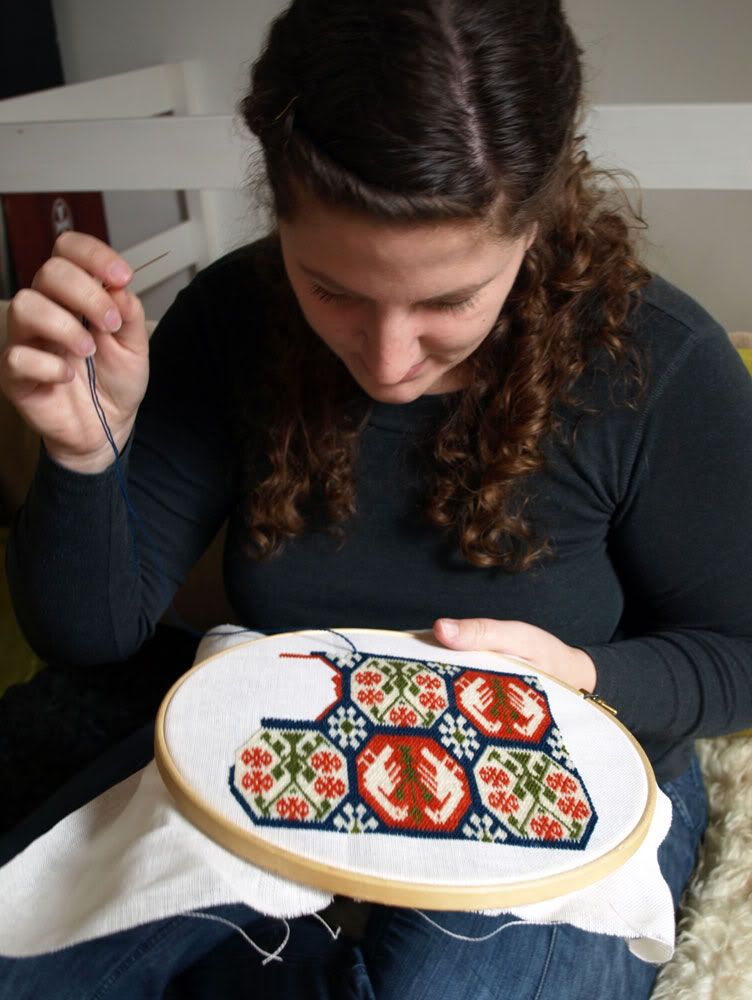
Louise is at the moment working on some new embroidery. She have tryed the pattern before which you can see at her old blog. This piece is going to become a small bag - maybe for her new out-fit.

We are looking forward to working on all these things... And a whole lot of other stuff. So even though the activity on this blog is somewhat low at this point, there should be plenty to read about in the future.
There are a lot of things that needs to be done before we can be ready for this years season. First of all we need to sew a tent and make poles and tentpegs. Thats the major project.
Besides that we need to make some furniture (tables and benches) and some lanterns.
We bought the fabric for the tent a couple of weeks ago and are currently working on the "blueprints" for the whole thing. We should be ready to start cutting the fabric any time now.
The tent will be a so called "Norman style tent" and it will be 4m wide, 3m tall and about 6m long.
It will look something like this <-- Link to www.Matuls.pl
The "normann tent" should be a nice tent for both sleeping and shopkeeping. And we are going to partition the tent in at least one end, to make room for sleeping.
We also need some new clothes! So yesterday we went to visit some nice "vikings" living in Fillerup (a small town near Odder, where we live). They have a small shop dealing in all kinds of re-enactment goods, like fabrics, rope, whetstones and all sorts of other materiale. We bought some very nice 2/2 wollen twill and some woll thread. The quality is very nice and it has that sweet wollen smell :-) Here is a link to their shop: http://www.glaipnir.dk/
The fabric and thread should be coloured and sewn into a pair of footed hose and a new bocksten kyrtle.
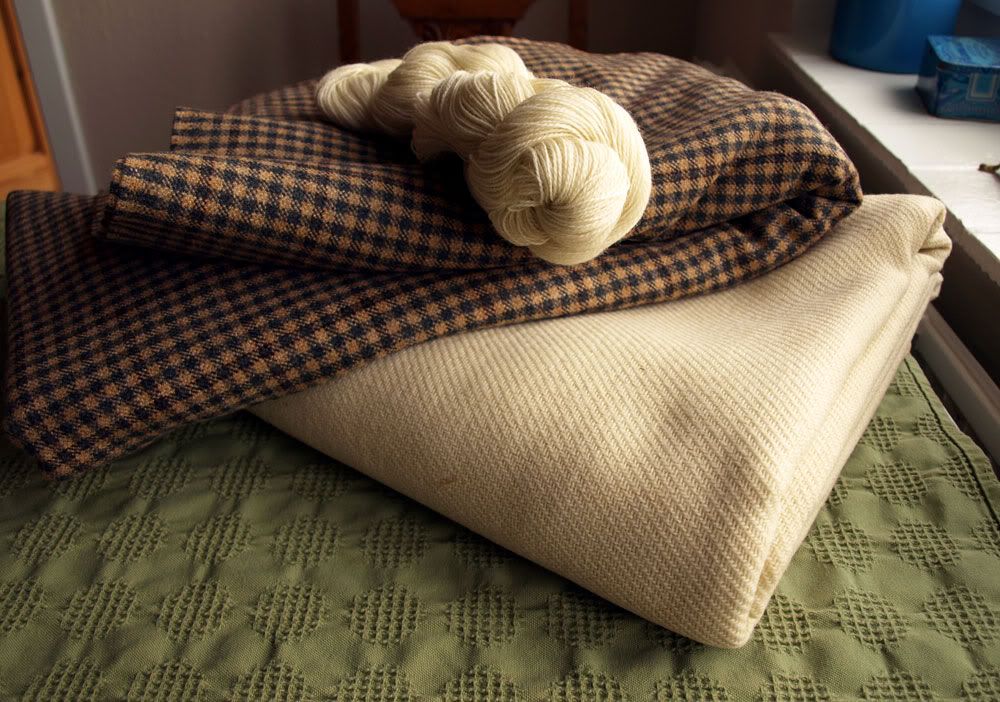
The checkered fabric is for Louises' new dress. A late 14th century dress based on London findings and with fabric buttons. This will be her fist 14th century dress and she is quite looking forward to making it. The plan is also to make a new apron with smock, a head veil with frills and a new underdress without sleeves. So there are much to work on.
Louise is at the moment working on some new embroidery. She have tryed the pattern before which you can see at her old blog. This piece is going to become a small bag - maybe for her new out-fit.
We are looking forward to working on all these things... And a whole lot of other stuff. So even though the activity on this blog is somewhat low at this point, there should be plenty to read about in the future.
Friday, February 20, 2009
A couple of weeks ago Louise and I went to visit some friends (and hopefully soon-to be contributors to this blog).
We had a very pleasant experience and got to try some new and interesting crafts.
For my part I got an oppotunity to try some blacksmithing. This was something new to me, and also a very enjoyable experience!
I starded by making a couple of S-hooks (wich I wont post any pictures of) and went on to make an eatingknife for Louise.
I won't get into the details of the whole process, but I will post a picture.

Tha blade was forged from spring steel and the handle is made from beech... and I'm pretty pleased with the result. Especially since it's only the third thing I have ever tryed smithing. Perhaps it's only beginners luck ;-)
We had a very pleasant experience and got to try some new and interesting crafts.
For my part I got an oppotunity to try some blacksmithing. This was something new to me, and also a very enjoyable experience!
I starded by making a couple of S-hooks (wich I wont post any pictures of) and went on to make an eatingknife for Louise.
I won't get into the details of the whole process, but I will post a picture.

Tha blade was forged from spring steel and the handle is made from beech... and I'm pretty pleased with the result. Especially since it's only the third thing I have ever tryed smithing. Perhaps it's only beginners luck ;-)
Monday, February 2, 2009
Leather costrel
In my last post I mentioned some "advanced stuff" that I was working on.
Well now it is done and I can finaly show you some pictures of what I have been doing.
This time it is a leather drinking bottle (also called a "costrel"). It is a bottle made from relatively thick leather (I used 2-3mm vegetable tanned leather) that has been sewn togeather, and lined with pitch (A cripy, yellowish resin derived from pine-trees) or beeswax (wich I used).
The costrel is decorated with pictures of saints that I copied from some very nice frescoes in Sahl church. A small church situated near Vinderup here in Denmark.
The frescoes are from ca. 1500... give or take a couple of years...
The frescoes are from ca. 1500... give or take a couple of years...
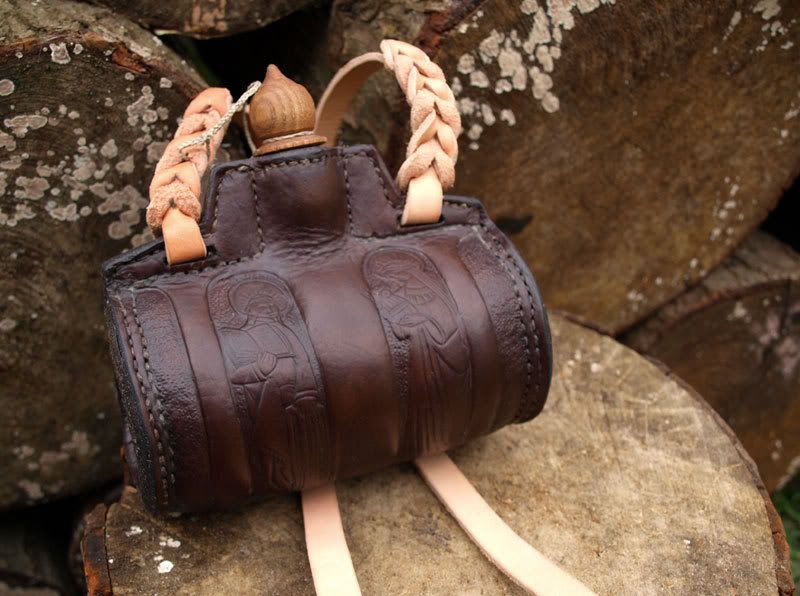

- Front and back of the bottle. The cork is made from oak.
Some of the edges of the costrel consist of several layers of leather. The top of the bottle where the strap is attached is made from 4 layers. The sides are made from 3 layers and the "mouthpiece" is made from 2 layers. The thick edges help to waterproof the seams, and the seams were actually almost watertight before I coated it with beeswax.
All seams were done with a double thread. Otherwise the thread would tear through whilst sewing with it.

- This is the bottle before I cut the holes for the strap end dyed it.
The extra layers only cover the seams, and does not extend more than a couple of millimeteres into the inside of the bottle.
When I cut the pieces to be sandwiched between the outer layers of the top the costrel I only cut the size to fit the inside of the bottle. When I have sewn them in place I trim down the excess. This makes it much easier to get a nice finish on the edges (I also sanded the edges with some sandpaper to get a nice even surface, and to remove some bad cuts that I made)
In the sides of the bottle I just insert a band of the same with as the seam allowance.


- The overlapping cut of the band and the inside of the bottle.
The band that I have sewn in to the sides and the mouthpiece are both cut exactly to size, and the edgs are cut at an angle to make a tighter seal.
The side piece is an almost "pearshaped" piece, that is pushed into the side of the bottle, while holding the "welt" or band in place. This is a bit tricky, and maybe it is easier to just start sewing in one side and then fit the side piece into place as you go...
Start by sewing the inmost seam.
Also I should be mentioned that the shape of the side piece determines the shape of the bottle. So if you want a flat bottom for the bottle to stand on, the end of the side piece should have a flat bottom too.

- This is the side of the bottle after the side piece has been sewn
in place (and the edges have been trimmed off).
When I had finished sewing the bottle together I dyed it with wallnut shells (as explained in an earlier post), rinsed it under running water and, stuffed the (still wet) bottle with dry sand.
You really have to force in the sand to get it tight enough to expand the leather. I used a funnel and the wide end of a chopstick to do this.
The bottle won't get much bigger, but it should expand a bit.
It is important to really pack the sand tightly in the bottle, beacuse makes it easier to mould the ornaments later on.
Now the bottle should be left to dry, for a day or two or until the leather has become completely dry.
If you want to do some ornaments on the bottle it should be done now... If not, it is ready to be sealed with wax.

- The braid on the strap.
To seal the bottle you need some beeswax, a hot oven, a small paint brush and a pot for melting the wax. First melt the wax. I do this in a pot directly on a hotplate and it works fine a long as you make sure that the wax won't burn the leather. Do this by holding a small scrap of leather into the molten wax. If it starts bubbleind around the piece of theater the wax is too hot. If no bottles can be seen the wax is fine.
The molten wax is then poured into the bottle and slushed around the entire inside of the bottle. Especially the seams!
Do this a couple of times till you feel sure that you covered everything.
Maybe the wax will start seeping through the leather and turning the colour darker. This is ok!
Now put the bottle in the oven and turn it on (Ca. 100 degrees celsuis). When the bottle is heated the wax will start seeping through the leather (this happens because all the pores in the leather are filled with wax)
Turn the bottle around a couple of times so that the leather sucks up all of the molten wax inside the bottle. Most of the bottle (maby exept for the edges) will turn dark.
The places that doesn't absorb the wax can be painted with molten wax from the pot, using a brush. Put the bottle back in the oven so the wax can be absorbed.
When the bottle has become dark all over it should be left to cool.
When the bottle is cold, puur in some water to make sure it is watertight. If it isn't you should pour out the water and let it dry. Then pour in some more molten wax and make sure it sets in to the seams.
This should do the trick! (If not try rubbing some soft wax in to the leaking places).
Now your costrel should be done, watertight and quite hard.
The leather turns almost plactic-like when it is saturated with wax. It shouldn't be necessary to grease the bottle itself. This might even dissolve the wax.
Now all that's left to do is attaching the carrying-strap. You can sew it in place or make a braid like the one I did.
Now all that's left to do is attaching the carrying-strap. You can sew it in place or make a braid like the one I did.


-Pictures of the four the frescoes from Sahl church.
Subscribe to:
Posts (Atom)